![]() Kun slutbruger-hjælpen er for tiden oversat til dansk. Hjælp til installation og administration af Zylinc-løsninger er for tiden på engelsk.
Kun slutbruger-hjælpen er for tiden oversat til dansk. Hjælp til installation og administration af Zylinc-løsninger er for tiden på engelsk.
Dette emne er fortrinsvis for administratorer og/eller folk som bestyrer en Zylinc-løsning
The Zylinc/Skype for Business (SfB) integration is relevant when you use SfB enterprise telephony in your organization. This topic explains how you:
-
Configure a Skype for Business environment, so that agents can use ZyDesk, with Skype as soft phone, to receive calls from voice queues
-
Install Skype for Business User Proxy
-
Get Skype presence via UCWA (Unified Communications Web API)
-
Make test calls to verify that integration between Skype for Business and Zylinc works correctly
-
Test that presence works correctly
Before you start, you should have installed a basic Zylinc environment, as described in Install a Zylinc solution from scratch. You must also have installed a basic Skype for Business environment, with support for enterprise telephony.
SfB User Proxy lets you view Skype presence. You can use UCWA, UCMA, user endpoints, or application endpoints to retrieve the presence data from the Skype environment, and you can get presence from both on-premise installations and from Office 365.
SfB User Proxy can also federate presence to Skype users. The system changes Skype users' presence, depending on the state of other phone types or the ZyDesk agent status. The presence is changed to busy, and the text is changed to, for example, mobile busy, BroadWorks busy, Cisco busy, or ZyDesk agent busy. When users are no longer busy, presence is reset back to its previous value.
The federation feature, as implemented in SfB User Proxy, uses UCMA and application endpoints to federate presence to Skype users. MSPL script isn't involved, and there's no need to install SfB MSPL Manager (described in the following) to use the federation feature.
You can use federation in on-premise environments, but it's not supported in Office 365.
The only purpose of SfB MSPL Manager is to provide the Busy-on-Busy functionality that lets you use activity- or busy-rules to intercept phone calls, so that incoming calls will not reach busy users.
SfB MSPL Manager is a service installed on Skype for Business frontend servers. It uses MSPL Script to monitor SIP signaling and, if Busy-on-Busy is enabled, it can intercept calls, before they're routed to Skype users.
If you don't use Busy-on-Busy, you don't need to install SfB MSPL Manager.
When SfB MSPL Manager starts, it connects to ZyDB to get the address and port number for SfB User Proxy, along with the rest of its configuration. SfB MSPL Manager then connects to SfB User Proxy.
SfB User Proxy and SfB MSPL Manager work together to provide Busy-on-Busy functionality. SfB User Proxy initiates a connection to the port that SfB MSPL Manager listens on, and the two services are then connected and ready to work together to provide the functionality.
You can use Busy-on-Busy in on-premise environments, but it's not supported in Office 365.
The only purpose of SfB Chat Queue Handler is to provide SfB chat queue functionality. SfB Chat Queue Handler uses UCMA and trusted application endpoints to provide the SfB chat queue functionality.
If you don't use the SfB chat queue feature, you don't need to install SfB Chat Queue Handler.
When you create chat queues, you must also create trusted application endpoints along with the queues, so that each chat queue can use its own specific endpoint. You can enter the SIP URI for an endpoint in the User field on a chat queue. This is similar to when you enter a phone number for a voice queue.
When SfB Chat Queue Handler starts, it connects to ZyDB to get its configuration. It then begins to listen to the network port that you've specified. Queue Manager (the standard Zylinc service that also handles voice queues) will then start a connection to the SfB Chat Queue Handler network port, and together the two services can then provide Skype chat queue functionality.
When an incoming chat inquiry arrives to a SfB chat queue, SfB Chat Queue Handler immediately answers the inquiry with predefined standard texts, for example a welcome message, and the queue position is announced to the user. Meanwhile, Queue Manager tries to find an available agent. When an agent becomes available, SfB Chat Queue Handler starts an outgoing chat session to the agent, and it then relays the two chat sessions, so that the agent and the user who made the inquiry can begin to chat.
You can use SfB chat queues in on-premise environments, but it's not supported in Office 365.
- Log in to Skype for Business Server Topology Builder as a domain administrator
- Select Download Topology from existing deployment
- Specify a file name for the downloaded topology
- In Skype for Business Server 2015 > Mediation pools, right-click your mediation server to Edit properties
- Select Enable TCP port
- In Listening Ports > TCP, enter 5068 - 5068
- In Topology Builder, Shared Components > PSTN Gateways, select New IP/PSTN Gateway...
- In FQDN, enter the hostname of Media Server
- In Define the IP address, click Next
- In Trunk name, enter a name (we recommend the name zyswitch)
- In Listening port for IP/PSTN Gateway, enter 5060
- In SIP Transport Protocol, select TCP
- In Associated Mediation Server Port, enter 5068
- Click Finish
- In the menu, select Action > Topology > Publish... and publish the topology
- Log in to Skype for Business Server 2015 Control Panel as a domain administrator.
- In Voice Routing, select TRUNK CONFIGURATION
- Double-click Global
- In Encryption support level, select Optional
- Select Enable forward call history
- Select Enable forward P-Asserted-Identity data
- OK
- Click Commit > Commit all
Still in Skype for Business Server 2015 Control Panel, you'll now create a route to Media Server, for all numbers starting with 100. Later, you'll create a voice queue on Media Server, with number 1000.
- In Voice Routing, select ROUTE
- Click New
- In Name, enter Zylinc
- In Starting digits for numbers that you want to allow, enter 100
- Click Add
- In Match this pattern, click Edit
- In Type a regular expression, enter ^100\d{1}
- In Associated trunks, click Add... and select the PSTN gateway
- In Associated PSTN usages, click Select...
- Double-click Internal
- OK
- OK
- Click Commit > Commit all
-
In Voice Routing, select VOICE POLICY
-
Double-click Global
-
In Associated PSTN Usages, Click Select...
-
Double-click Internal
-
In Associated PSTN Usages, Click Select...
-
Double-click Local
-
Make sure the PSTN usage record ordering is Internal first and then Local
Use the arrow buttons if you need to reorder the sequence.
-
OK
-
Click Commit > Commit all
- In Voice Routing, select TRUNK CONFIGURATION
- Double-click Global
- In Associated PSTN Usages, click Select...
- Double-click Internal
- In Associated PSTN Usages, click Select...
- Double-click Local
- Make sure the PSTN usage record ordering is Internal first and then Local
- OK
- Click Commit > Commit all
You're going to use the numbers 2000, 2001, 2002, etc.for the Skype users. Therefore, you'll edit LocalRoute, so that all numbers starting with 2xxx is routed to LocalRoute.
- In Voice Routing, click ROUTE
- Double-click LocalRoute
- In Match this pattern, click Edit
- In Type a regular expression, enter [2]\d{3}
- OK
- Click Commit > Commit all
- In Voice Routing click ROUTE
- Double-click Zylinc
- In Associated PSTN Usages, click Select...
- Double-click Local
- OK
- Click Commit > Commit all
- In Users, click Enable users
- Click Add...
- Click Find
- Select a user in the list, and click OK
- In Assign users to a pool, select a pool
- Select Use the following format <SAMAccountName> @, and then select the domain
- In Telephony, select Enterprise Voice
- In Line URI, enter tel:2000
Repeat the steps to add at least one more user. Use Line URI tel:2001 and so on.
- You can use Skype and Zylinc queue phone numbers with three digits or more. Numbers with only one or two digits will not work.
- Create an AD group with the name ZyDesk users
- Add the agents to the ZyDesk users group
- Make sure that the directory sync module works correctly
- In the Administration Portal menu, select SYSTEM > Interface Configuration
- Make sure that LDAP Url is entered correctly, for example: ldap://<domain controller>:389/
- Make sure that LDAP System User and password are correct
- Make sure that you've selected ZyDesk PW Login to Portals
- In the Administration Portal menu, select INSTALL > Portal Configuration
- Select SIP Trunks
- In the Administration Portal menu, select SYSTEM > SIP Trunks
- Click Add SIP Trunk
- In SIP Trunk Name, enter a name (we recommend the name Skypetrunk)
- In Host, enter the hostname of the mediation server
- In Port, enter 5068
- In Transport, select TCP
- In CallerID Type (outgoing INVITE), select SIP P-Asserted-Identity
- In Administration Portal, select NETWORK > Directory Settings, and click Reinitialize
- Log out of Administration Portal, and log in again
- In Administration Portal, select SYSTEM > User Directory
- In Shortnumber length, select 7
- In Default Country Code, enter 45 (or a code for your country)
- In Prefix, enter +
- In Primary PBX, select Skype for Business
- In Default Agent Phone, select Skype for Business Number
- Save
- Format Users
For more information, see Specify number plan settings.
Do the following for the first user:
- In the Administration Portal, select USERS > ZyDesk Users
- Click the user who you want to promote
- In ZyDesk Access Settings, select Create on save (if the user is not yet created for ZyDesk access)
- Save
- In the Administration Portal, select USERS > ZyDesk Profiles
- Select a profile type that supports agents (Attendant Console, Contact Center, or Service Center)
- Add the user to the Included list
- Add the group ZyDesk users as well
- Save
- In the Administration Portal, select USERS > Agents
- Click User
- Verify that User (Operator) Device is marked as default and Skype for Business
- Verify that User (Agent - Incoming Calls) Device is marked as default and Skype for Business
Repeat the steps for at least one more user.
- In the Administration Portal, select QUEUES > Voice Queues
- Click Add Voice Queue
- In Name, Enter TestQueue1000
- In Number, Enter 1000
- In Failover - Queue Open > Unmonitored Queue, select Queue Calls
- Save
- Click USERS
- In Primary, add ZyDesk Administrator
- In Primary, add the user who has enterprise telephony enabled on number 2000
- In Primary, add the user who has enterprise telephony enabled on number 2001
- In Primary, add the ZyDesk users group
- In the Administration Portal, select USERS > ZyDesk Users
- Click ZyDesk Administrator
- In ZyDesk Access Settings, select Create on save (if the user is not yet created for ZyDesk access)
- Save
- In the Administration Portal, select USERS > ZyDesk Profiles
- Select a profile type that supports agents (Attendant Console, Contact Center or Service Center)
- Add ZyDesk Administrator to the Included list
- In the Administration Portal, select USERS > Agents
- Click ZyDesk Administrator
- In User (Operator), clear Default
- In User (Operator) Device, select Internal
- In Agent Incoming Calls, clear Default
- In Agent Incoming Calls Device, select Internal
- Install ZyDesk on the Zylinc Windows application server
- In the Deployment Manager menu, select Database > ZyDB > ZyDesk
- Click Generate encrypted file
- Save as <release folder path>\4_ZyDesk\ZyDesk.ini
- Copy <release folder path>\4_ZyDesk\ZyDesk.ini to C:\Program Files (x86)\Zylinc\ZyDesk\ZyDesk.ini
- Start ZyDesk
- Log in with user: administrator@zylinc.com and the password: password
- In the ZyDesk menu, select Actions > Administer Queues
- Make sure to select TestQueue1000
ZyDesk and the internal softphone are now ready to receive calls from the queues.
On a test client computer:
-
Install ZyDesk (as previously described)
-
Log in to Skype with the user who has enterprise telephony enabled on number 2000
-
Log in to ZyDesk with the same user.
ZyDesk and Skype must run in the same session on the same computer
-
In the ZyDesk menu, select Actions > Administer Queues
-
Make sure to select TestQueue1000
ZyDesk and Skype are now ready to receive calls from the queues.
Before you carry out the tests, we recommend that you reset the agent device number, rewrite config and reset the ZyDesk connections:
- In the Administration Portal menu, select USERS > Agents
- Click the agent who has enterprise telephony enabled on number 2000
- In Agent - Incoming Calls, Number, select Skype for Business
- Save
- In the Administration Portal menu, select INSTALL > Database Connection
- Click Rewrite Config
- In ZyDesk, on the application server:
- Disconnect all
- Connect all
On the test computer:
- Log in to Skype with the user who has enterprise telephony enabled on number 2000
On the application server:
- Start ZyDesk
- Log in with user: administrator@zylinc.com and the password: password
- Test that you can call 2000
On the test computer:
- Test that you can answer the call
On a test client computer:
-
Log in to Skype with the user who has enterprise telephony enabled on number 2000
-
Log in to ZyDesk with the same user.
ZyDesk and Skype must run in the same session on the same computer.
-
In the ZyDesk menu, select Actions > Administer Queues
-
Make sure to select TestQueue1000
ZyDesk and Skype are now ready to receive calls from the queues.
On the test computer:
- Use MicroSIP to call 1000 on Media Server, see Use MicroSIP on test computer to call queue
- Test that you can answer the call
- Log in to Active Directory Users and Computers as a domain administrator
- Create a new service account user
- In Skype for Business Server 2015 Control Panel, Click Users
- Click Enable users
- Click Add...
- Click Find
- Select the UCWA service user, and click OK
- In Assign users to a pool, select a pool
- In Telephony, select PC-to-PC only
- Make sure that the Line URI field is empty
- Click Enable
- In the Administration Portal, select INSTALL > Portal Configuration
- Select Lync/SfB
- In the Administration Portal, select NETWORK > SfB Configuration
- Select Activate
- In Domain Whitelist, enter the name of your domain
- Save
- In the Administration Portal, select NETWORK > SfB Configuration
- Click SETUP (in the top right corner)
- In Pool Address, enter the address of your mediation server
- In Pool Port, enter 5061
- In Skype for Business Client SIP Trunk, select your trunk
- In Skype for Business Internal SIP Trunk, select your trunk
- In Skype for Business User Proxy, General, Connection Type, select UCWA
-
In Skype for Business User Proxy, UCWA, in Azure Domain Name, enter the name of your domain, for example: domain.com
-
In Application Id:
- If you use Skype for Business on-premise, leave Application Id blank
- If you use Skype for Business Online, you need to set up an app registration, and then enter the APPLICATION ID for that registration, for example: d25dc698-e2d3-410f-9b48-b8abaf2cf231
-
If you use Azure: In Client Secret, specify the client secret that you've set up in Azure (under Manage > Certificates & secrets in Azure).
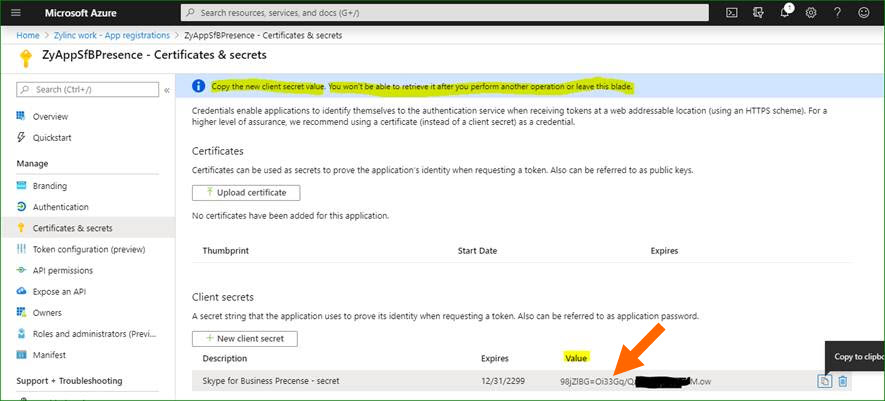
Note that, in Azure, you can only view and copy the client secret when you add it. You won't be able to retrieve it after you perform another operation or move away from the blade in Azure.
-
In User and Password, for every chunk of up to max. 1500 users that you need to get presence from, enter an e-mail address and password for a UCWA service user. For example, if you need to get presence from 1501 users, you need to set up at least two UCWA service users.
As you get closer to the 1500 users limitation for each of the UCWA service users, the system will need more time to initialize presence for the users in your organization after a service restart. If you want the service to start faster, you can set up more UCWA service users.
- Save
With Skype for Business User Proxy you can:
- View presence for Skype users.
- Federate presence: The system changes Skype user's presence, depending on the state of other phone types or the agent status. The presence is changed to busy, and the text is changed to, for example, mobile busy, BroadWorks busy, Cisco busy, or ZyDesk agent busy. When users are no longer busy, presence is reset back to its previous value.
- Busy-on-Busy, that requires additional installation of MSPL Manager, lets you use activity- or busy-rules to intercept phone calls.
Federation and Busy-on-Busy requires UCMA, so for now you'll set up Skype presence only.
Skype User Proxy requires that UCMA 4.0 is installed, even when you don't use application endpoints.
On the Zylinc Windows Application Server:
-
Download Unified Communications Managed API 4.0 Runtime: https://www.microsoft.com/en-us/download/details.aspx?id=34992
-
Run UcmaRuntimeSetup.exe and install UCMA 4.0
Only UCMA version 4.0 is supported. If you have other UCMA versions installed on the Zylinc Windows Application Server, you must remove those versions.
- In the Deployment Manager menu, select Deployment > Installation
- In Installers, select Lync User Proxy
- Click Install Applications
- In the Deployment Manager menu, select Deployment > Windows Services
- In Deployed Services, select Zylinc Lync User Proxy
- Click Start services
-
Log in to ZyDesk with a Skype agent and operator user.
You can't use ZyDesk Administrator for this, because it's not a Skype operator user.
-
Verify that you can view presence
If you use Skype for Business together with an AudioCodes gateway, there's a risk that calls can get disconnected in the middle of conversations.
If you change a few of the default settings in Skype for Business and AudioCodes, you can avoid that risk.
See Skype for Business with AudioCodes: Prevent disconnected calls
Check the following to avoid blocking of the completion of TLS negotiation, which can appear as certificate errors in the logs:
- Disable sip inspection (also known as SIP ALG) in the routers/firewall between the Zylinc Windows Application Server and the SfB Front-End Server(s)
Three log files are useful for advanced troubleshooting related to the integration between Zylinc and Skype for Business.
- SfB Chat Queue Handler log file
- SfB MSPL Manager log file
- SfB User Proxy log file
For information about how to find and open those log files, see Open latest log file from specific Zylinc module.
- Open all three log files in Notepad++ and search for the words error or exception. Lines that contain those words should provide detailed information about errors that prevent the system from running correctly.
Dette er hjælp til Zylinc version 6.5. Du kan vælge hjælp til andre versioner her.
© 2021 Zylinc A/S • Ansvarsfraskrivelse
Zylinc unified help har vundet UK Technical Communication Awards 
Hjælpeversion: 24 februar 2021 15:41:38
Del denne side med andre: