Dette emne er fortrinsvis for administratorer og/eller folk som bestyrer en Zylinc-løsning

You can set up many different audio announcements that callers will hear if, or when, different events happen on a call in a voice queue.
If you use music on hold, the music will pause when announcements are played.
You can set up most announcements to be played repeatedly, and with their own individual pause between each repetition of that announcement. This pause is known as an announcement's Frequency. For example, one announcement can play every 120 seconds, and another can play every 30 seconds.
If two announcements overlap, they'll play back in their full duration, one after the other. An announcement will never pause to make room for another announcement. Only music on hold will do that.
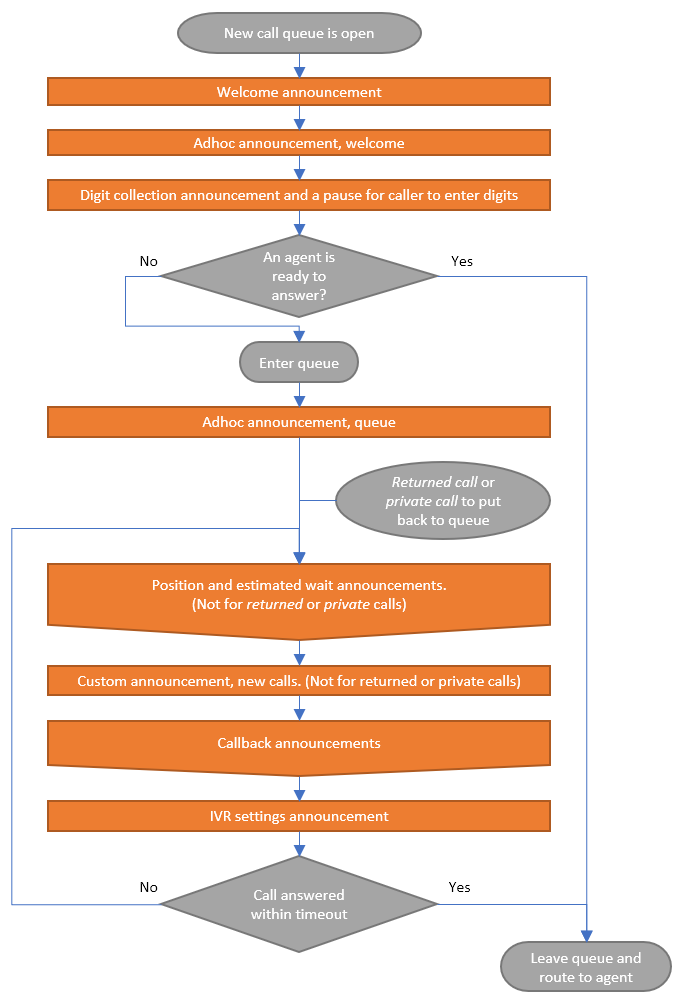
Download this drawing as a PowerPoint presentation.
-
Welcome announcement: You can play this announcement, once, to all callers.
-
Adhoc announcement, welcome: You can play this announcement, once, immediately after the welcome announcement, to all callers.
Ad-hoc announcements are designed for temporary use, for example when you need to inform callers about longer-than-usual waiting times. When you upload an ad-hoc announcement, you must select Ad Hoc. This is because ad-hoc announcements are stored and handled in a separate repository.
-
Digit collection announcement: A digit collection announcement is useful when you need to ask the caller to enter an account number, a social security number, a case number, or similar. You can then use the entered number to, for example, Invoke third-party systems and pass parameters (CRM lookup), or to set up Caller-rated distribution (VIP routing).
You can play this announcement, one or more times, to all callers. After the announcement, you can specify the length of a pause, for the user to enter a certain number of digits on the phone keypad within a certain time.
If the caller can’t enter any digits, or doesn’t enter a certain number of digits, you can give up digit collection after a certain number of retries. The call flow will then continue to the next step, and no digits will be registered.
-
Adhoc announcement, queue: You can play this announcement, once, to callers who are going to wait for an available agent. If an agent is immediately available, that agent will get the call, and the announcement will never be played.
Ad-hoc announcements are designed for temporary use, for example when you need to inform callers about longer-than-usual waiting times. When you upload an ad-hoc announcement, you must select Ad Hoc. This is because ad-hoc announcements are stored and handled in a separate repository.
-
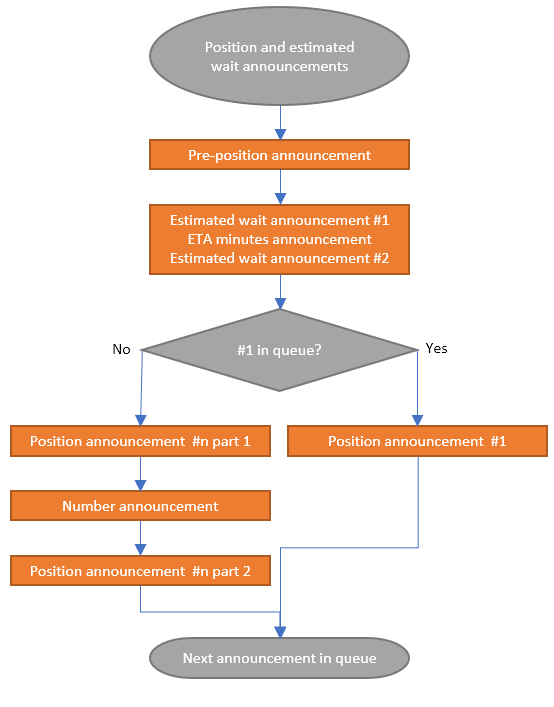
Pre-position announcement: You can repeatedly play this announcement, just before the position announcement, for example every 30 seconds, if a caller waits for an available agent, and if you’ve selected position announcement.
The pre-position announcement is useful when you want to announce something just before the position announcement.
Example: Unfortunately, all our agents are still busy. Please wait.
-
Position announcement: You can repeatedly play an automated announcement of the caller’s current position in the queue, for example every 30 seconds, if a caller waits for an available agent.
Example (when the caller is first in the queue): Your call is now first in line and will be answered by the next available representative.
Example (when the caller is number 4 in the queue): You are currently caller number 4, waiting to speak with a representative.
-
Estimated wait announcement: You can play an automated announcement of the estimated number of minutes that callers will currently have to wait in the queue. For more information see Set up estimated waiting time announcements.
-
Custom announcement, new calls: You can repeatedly play this announcement, for example every 30 seconds, if a caller waits for an available agent. A custom announcement for new calls is useful when you want to announce something about the queue that callers wait in.
Examples:
- You can use our web page to find answers to frequently asked questions.
- This week you can save up to $100 on product X.
- You're waiting for a support engineer to become available. There's a serial number on the back of your product. Please have that number ready. -
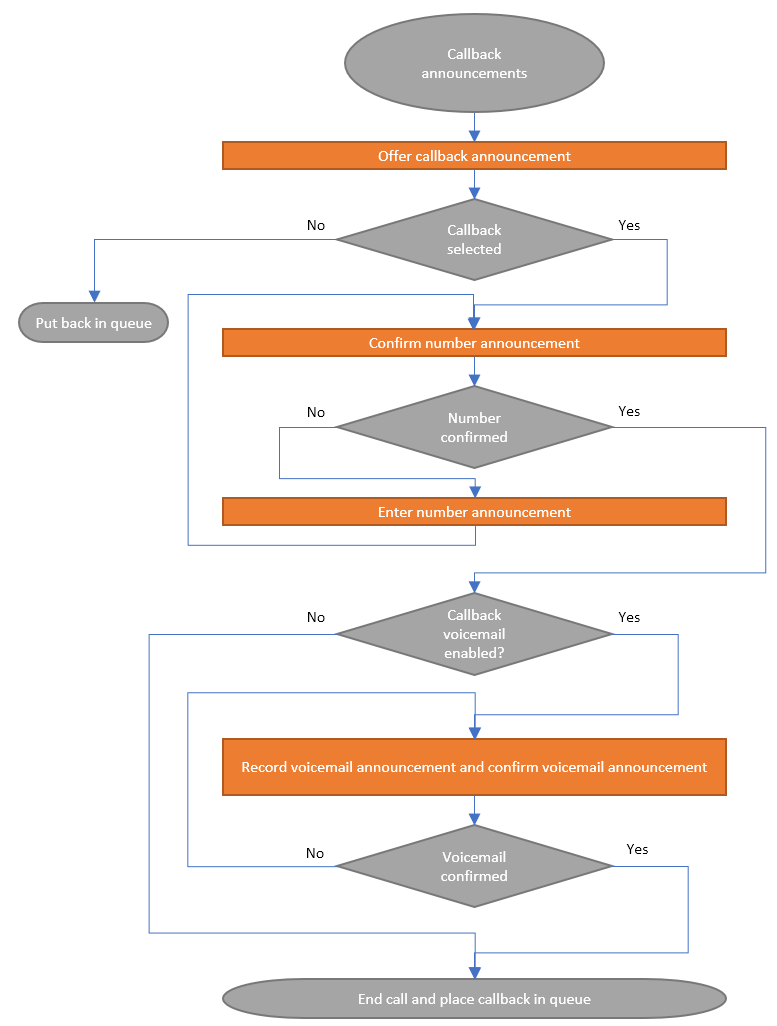
Callback announcement: You can repeatedly play this announcement, for example every 30 seconds, if a caller waits for an available agent.
A callback announcement is useful when you need to inform callers that they can press a certain key to be called back when it’s their turn, for example if they've waited in a queue for more than 30 seconds.
By default, the repetition frequency for this announcement is set to Only Once, and because of that, this announcement won't repeat unless you change that setting.
For more information see Set up callbacks.
-
IVR settings announcement: You can repeatedly play this announcement, for example every 30 seconds, if a caller waits for an available agent.
An IVR settings announcement is useful when you want to offer callers some options if they've waited in a queue for more than, say, 30 seconds.
By default, the repetition frequency for this announcement is set to Only Once, and because of that, this announcement won't repeat unless you change that setting.
For more information see Set up in-queue IVR menu with callback option.
-
Custom announcement, returned calls: You can repeatedly play this announcement, instead of custom announcement, new calls, for example every 30 seconds, if a call has come back to a queue, for example because of a failed transfer, and the caller once again waits for an available agent in the same queue.
Custom announcement, new calls aren't played back long as the call remains in the returned call state.
Position announcement and estimated wait announcements are not played back as long as the call remains in the returned call state. This is because returned calls are prioritized above normal calls in the queue, and therefore becomes the new number 1 in the queue.
Because returned calls are prioritized above other calls in the queue, you can set custom announcement, returned calls to either - #1 in queue (simple) (Your call is now first in line) or to - #1 in queue (advanced) (Your call is now first in line, and will be answered by the first available representative)
-
Private announcement: You can repeatedly play this announcement, instead of custom announcement, new calls, for example every 30 seconds, if an agent has answered the call, and then decided to transfer the call to another agent. If the other agent is busy, the caller will now wait for that specific agent to become available.
Custom announcement, new calls aren't played back long as the call remains in the private call state.
Position announcement and estimated wait announcements are not played back as long as the call remains in the private call state. This is because private calls are prioritized above normal calls in the queue, and therefore becomes the new number 1 in the queue.
Because private calls are prioritized above other calls in the queue, you can set private announcement to either - #1 in queue (simple) (Your call is now first in line) or to - #1 in queue (advanced) (Your call is now first in line, and will be answered by the first available representative)
Pre-position announcements, position announcements, estimated wait announcements, custom announcements for new calls, callback announcements, and IVR settings announcements will repeat in a loop for as long as the call waits in the queue for an agent to become available. Because frequency for callback announcement and IVR settings announcement are, by default, set to Only Once, you'll have to change those settings, if you want those announcements to repeat.
If a call has come back to the queue as a returned call, or if a call has been transferred to a specific agent by another agent and is therefore marked as a private call, the following announcements aren't played: Custom announcement, new calls, position announcement and estimated wait announcement. For more information, see the announcement types Custom announcement, returned calls and Private announcement in the previous.
Tip from experienced Zylinc administrator: “In our organization, we often know from the outset that we're likely to need certain ad-hoc announcements sooner rather than later. That's why we choose to record those ad-hoc announcements in advance when we set up new queues. That way, we have the ad-hoc announcements that we know we're going to need, like We're typically very busy with passport renewals in the weeks leading up to holiday periods; we apologize for the longer-than-usual waiting time, ready to use when they we them.”
When a call is going to leave a voice queue, or when a voice queue is closed, you can use the following announcement types:
- Failover announcement: You can play this announcement, once, if the call is going to leave the queue, for example because too many calls are already waiting in the queue, or because no agents have been logged in to the queue for a certain amount of time.
- Closure announcement: You can play this announcement, once, if the call is going to leave the queue because the queue is closed.
- If you've set up a calendar, you can also select a special announcement on closure to use for that calendar, instead of the normal closure announcement from the voice queue. The calendar’s announcement on closure will be played if the queue closes because of a close exception in the calendar.

Download this drawing as a PowerPoint presentation.
Pickup announcements are useful if agents always need to say the same things when they pick up the phone.
Example: This is Karen. How may I help you?
You can record an announcement, optionally in the agent’s own voice, and let the system automatically play that announcement when the agent picks up the phone.
-
Global pickup announcement: In the Administration Portal menu, select CLIENTS > General Settings.
You can play the Global pickup announcement to the caller, or to the caller as well as the agent, just after the agent picks up the call, but before the audio conversation begins.
-
Personal pickup announcement: In the Administration Portal menu, select USERS > Agents, and the select the required agent.
You can play the Personal pickup announcement to the caller, or to the caller as well as the agent, just after the agent picks up the call, but before the audio conversation begins.
If you specify a personal pickup announcement for an agent, that personal pickup announcement will override any global pickup announcement.
If your organization works in an international environment, you can have audio announcements in multiple languages.
For more information, including language detection methods, how to manage multi-language announcements, and some useful hands-on exercises, see Audio announcements in multiple languages.
These exercises will give you hands-on experience for when you're going to set up audio announcements for voice queues.
Carry out the exercises in a test environment. When you've familiarized yourself with how announcements work, you can make changes on your real Zylinc solution.
You're going to set up a solution for the following use case:
As a call center manager, I need three queues with three distinct numbers: Sales, Support, and Accounting. I want callers who wait in those queues to know whether they're waiting for a service engineer, a sales representative, or an accountant. I also want callers to know their queue positions. If an agent is immediately available, take the caller directly to the agent without announcing anything. I only need English language on all three queues. I’ve got the following audio files that I want to use.
-
Lab-01-wait-for-service-engineer-EN.wav:Please wait. You will be transferred to the next service engineer that becomes available.
-
Lab-01-wait-for-sales-representative-EN.wav:Please wait. You will be transferred to the next sales representative that becomes available.
-
Lab-01-wait-for-accountant-EN.wav:Please wait. You will be transferred to the next accountant that becomes available.
On a Windows 10 laptop, do the following to create the WAV announcements that you're going to use:
-
In the Windows Start menu, select PowerShell
-
Make a copy of the PowerShell code in Create_WAV_files_for_audio_lab_Exercise.txt, and paste it into the PowerShell window
-
You may need to press <Enter> for the script to run
The script uses Windows speech synthesis to create a folder called WAV announcements on your desktop. The folder contains the audio files that you're going to use in the following.
- In the Administration Portal menu, select AUDIO > Upload Audio Files
- In Filename, click Choose File and select the audio file that you need to upload. For example, select Lab-01-wait-for-accountant-EN.wav in the WAV announcements folder on your desktop.
- In Language, select English
- In Name, enter a name for the announcement. The name should not contain any reference to a language. For example, you can change Lab-01-wait-for-accountant-EN to Lab-01-wait-for-accountant
- Click Upload
Repeat the steps for the two other WAV files from the use case:
- Lab-01-wait-for-sales-representative-EN.wav
- Lab-01-wait-for-service-engineer-EN.wav
- In the Administration Portal menu, select QUEUES > Voice Queues, and click the Add Voice Queue link at the bottom of the page
- In Name, enter a name for the voice queue, for example, Accounting
- In Number, enter a number for the voice queue, for example 1030
- In the Failover - Queue Open section, in Unmonitored Queue, select Queue Calls
- In the Announcements section, in Custom announcement, New Calls, select the announcement that you want to play if a caller waits for an available agent, for example Lab-01-wait-for-accountant
- In Frequency, for Custom announcement, New Calls, select 10 sec
- In Enable Position Announcement, select Enable
- Click Save
- Click USERS (in the top-right corner)
- Add the persons or groups that you want to become agents on the queue to Primary, for example, ZyDesk Administrator.
- Click Save
Repeat the steps for the two remaining queues in the use case:
- For the Sales queue, you can use number 1031, and the announcement Lab-01-wait-sales-representative
- For the Services queue, you can use number 1032, and the announcement Lab-01-wait-support-engineer
Test that you hear the correct announcements:
- Close all Zylinc clients, to make sure that no agents are logged in to the queues.
- Call the Accounting queue.
- You should hear an announcement: Your call is now first in line.
- You should also hear an announcement that states that you're currently waiting to speak with an accountant.
- Hang up.
Test that, if an agent is available, you're taken directly to the agent without any announcements.
-
Log in to ZyDesk as an agent on the Accounting queue.
-
Call the Accounting queue. You should hear music-on-hold and no announcements, and the agent’s phone should ring.
-
In ZyDesk, click Answer, to answer the call before the timer sets the agent to unavailable.
If the agent takes too long to answer the call, the agent becomes unavailable, and the call fails back to the queue, as a returned call. Because of that you’ll hear music-on-hold, and no announcements.
-
Hang up
You can repeat similar tests for the other queues in the use case:
- Sales
- Support
You're going to set up a solution for the following use case:
As a call center manager, I temporarily want all callers to our Support queue to know that: Some customers will currently see error 500 on the screen, and can’t use our service. We are working to solve that issue as fast as we can. You can follow the status of the issue on our social media page. Because of the issue, waiting times can be longer than usual. Play that announcement once, before any calls enter our Support queue, even if an agent is currently available. I don’t have a WAV file for this purpose. I want to use the dial-in recording phone number, and the agent Karen, who isn’t an administrator, and who doesn’t use the Administration Portal, needs to be able remove the announcement when the issue is solved.
Set up the support queue, as described in Repeating custom and position announcement for waiting callers
- In the Administration Portal menu, select SYSTEM > Switch Settings
- In the Announcement Recording section:
- In Pin-code for IVR, enter a pin code that callers must enter to be able to use the announcement recording functionality, for example: 1234
- In Dial-in number English, enter a phone number to use for the dial-in recording, for example: 1033
- In the Administration Portal menu, select INSTALL > Portal Configuration.
- Check that Annc. Recording in selected.
- In the Administration Portal menu, select AUDIO > Annc. Recordings.
- In Display Name, enter a name for the recording, for example: lab-01-service-error-500.
- In Recording ID, enter a number for the recording. You're going to enter that number on the phone keypad when you call to record (or delete) the announcement. For example, you can enter 1 for the first recording.
- Click
 .
. - Click Save.
You can now see a new recording on the screen. The status of the recording is Empty, and the font is strikethrough. That’s because you haven’t yet called the announcement recording number to make an actual recording. For now, the new recording is just a placeholder that you can select in the Administration Portal, even before it contains any recorded audio.
- In the Administration Portal menu, select QUEUES > Voice Queues, and go to the queue on which you need to use a recorded ad-hoc announcement, for example: Support
- In Adhoc announcement, Welcome, select the announcement that you want to play to all callers, once, immediately after the welcome announcement. In the list, find Announcement Recording, and find the recording that you previously created, for example: lab-01-service-error-500
-
Call the number that you've specified in the Administration Portal (if in doubt, you can view the number under Dial-in Number English when you select SYSTEM > Switch Settings in the Administration Portal menu).
-
When needed, enter the pin code on the phone keypad, followed by a #.
If you use MicroSIP softphone, and you can’t enter the pin code, try the following: In MicroSIP Settings, in DTMF method, select SIP-INFO.
For more information, see Use MicroSIP on test computer to call queue -
When needed, enter the message ID number on the phone keypad, followed by a #.
-
On the phone keyboard, press 3, to change the message.
-
Speak the message to record. When done, press # on the phone keypad.
If you use MicroSIP softphone, and you hear a message that says that the recorded message is too short, it can be because RTP traffic between your softphone and the Zylinc solution's Media Server is blocked by NAT or firewalls. You can try to disable firewalls, or you can try the following:
1. In MicroSIP Settings, select Edit Account.
2. In Public Address, change Auto to the IP address of the network adapter on the same subnet as the Media Server. For example, if you use Hyper-V to run Media Server behind NAT on a laptop, select the IP address of Ethernet adapter vEthernet (Default Switch).
For more information, see Use MicroSIP on test computer to call queue -
Press 1 to accept
-
Hang up
- Call the queue
- You should hear the ad-hoc announcement that you’ve recorded.
In the use case, an agent without access to the Administration Portal needs to be able delete the announcement after the issue has been solved.
-
Call the number that you've specified. (that's the Dial-in Number English when you select SYSTEM > Switch Settings in the Administration Portal menu).
-
When needed, enter the pin code on the phone keypad, followed by a #.
-
When needed, enter the recording ID number, followed by a #.
-
On the phone keypad, enter 4 to delete the message.
In the Administration Portal, you can make a copy of an announcement that you've recorded:
1. In the Administration Portal menu, select AUDIO > Annc. Recordings.
2. Select the recording that you want to copy.
3. Optionally, change Name, Category, or Language, and in Ad Hoc select if you need to copy the recording as a new ad-hoc announcement or a new custom announcement. In Overwrite, select if you want to overwrite an existing announcement.
4. When ready done, click Copy.
- Call the queue
- You should no longer hear the ad-hoc announcement.
You're going to set up a solution for the following use case:
As an agent, I want the system to use a recording to welcome the caller. The recording must present myself, with my own name, in my own voice, so that I don’t have to do that myself for every call that I answer. Play that recording to the caller, and to myself, just after I pick up the call, but before the conversation begins.
- In the Administration Portal menu, select SYSTEM > Switch Settings
- In the Announcement Recording section:
- In Pin-code for IVR, enter a pin code that callers must enter to be able to use the announcement recording functionality, for example: 1234
- In Dial-in number English, enter a phone number to use for the dial-in recording, for example: 1033
- In the Administration Portal menu, select INSTALL > Portal Configuration.
- Check that Annc. Recording in selected.
- In the Administration Portal menu, select AUDIO > Annc. Recordings.
- In Display Name, enter a name for the recording, for example: lab-03-personal-pickup-Karen.
- In Recording ID, enter a number for the recording. You're going to enter that number on the phone keypad when you call to record (or delete) the announcement. For example, you can enter 1 for the first recording.
- Click .
- Click Save.
-
Call the number that you've specified in the Administration Portal (if in doubt, you can view the number under Dial-in Number English when you select SYSTEM > Switch Settings in the Administration Portal menu).
-
When needed, enter the pin code on the phone keypad, followed by a #.
If you use MicroSIP softphone, and you can’t enter the pin code, try the following: In MicroSIP Settings, in DTMF method, select SIP-INFO.
For more information, see Use MicroSIP on test computer to call queue -
When needed, enter the message ID number on the phone keypad, followed by a #.
-
On the phone keyboard, press 3, to change the message.
-
Speak the message to record. When done, press # on the phone keypad.
If you use MicroSIP softphone, and you hear a message that says that the recorded message is too short, it can be because RTP traffic between your softphone and the Zylinc solution's Media Server is blocked by NAT or firewalls. You can try to disable firewalls, or you can try the following:
1. In MicroSIP Settings, select Edit Account.
2. In Public Address, change Auto to the IP address of the network adapter on the same subnet as the Media Server. For example, if you use Hyper-V to run Media Server behind NAT on a laptop, select the IP address of Ethernet adapter vEthernet (Default Switch).
For more information, see Use MicroSIP on test computer to call queue -
Press 1 to accept
-
Hang up
- In the Administration Portal menu, select USERS > Agents
- Click the name of the agent who you want to set up a personal pickup announcement for.
- In Personal Pickup Annc., select the announcement that you want to play, for example: lab-03-personal-pickup-Karen
- In Play for me, select Yes
- Log in to ZyDesk as the agent who you’ve set up a personal pickup announcement for
- Call a queue that the agent is a member of
- In ZyDesk, answer the call
- Check that the caller hears the personal pickup announcement that you recorded
You're going to set up a solution for the following use case:
As a call center manager, I want an announcement to handle the fact that my team and myself are away on a team building event next Friday. I want the announcement to be played on the day of the event, but I want to set it up in advance, and automatically remove the announcement the following day. I’ve got this audio file that I want to use:
- Lab-04-closed-yearly-team-building-EN.wav: We are closed for normal service requests today, because of our yearly team building event. For emergencies, you can use our alarm number: 12345678.
You can set up a normal closure announcement to use when the queue is closed due to normal opening hours:
- In the Administration Portal menu select QUEUES > Voice Queues
- Click the name of the queue that you need to set up a closure announcement for
- In Closure Announcement, select zylinc-officeClosed. That’s a standard announcement, always available in the system: The office is closed, please try to call again later.
On a Windows 10 laptop, do the following to create the WAV announcements that you're going to use:
-
In the Windows Start menu, select PowerShell
-
Make a copy of the PowerShell code in Create_WAV_files_for_audio_lab_Exercise.txt, and paste it into the PowerShell window
-
You may need to press <Enter> for the script to run
The script uses Windows speech synthesis to create a folder called WAV announcements on your desktop. The folder contains the audio files that you're going to use in the following.
- In the Administration Portal menu, select AUDIO > Upload Audio Files
- In Filename, click Choose File and select the audio file that you need to upload. For example, select Lab-04-closed-yearly-team-building-EN.wav in the WAV announcements folder on your desktop.
- In Language, select English
- In Name, enter a name for the announcement. The name should not contain any reference to a language. For example, you can change Lab-04-closed-yearly-team-building-EN to Lab-04-closed-yearly-team-building
- Click Upload
-
In the Administration Portal menu, select QUEUES > Calendars
-
Click Add Calendar
-
In Name, enter a name for the calendar, for example yearly teambuilding
-
In Announcement on closure, select the announcement that you want to play instead of the normal closure announcement when—because of this calendar—a voice queue becomes closed outside of normal hours, for example, Lab-04-closed-yearly-team-building
-
In Open, make sure the box is cleared, so that this calendar will cause the voice queue to close.
-
In Date, select the date you need to close, and add the date to the calendar.
The date appears in the list. Note that [Cl] next to the date indicates that the queue will be closed.
-
In the Administration Portal menu select QUEUES > Voice Queues
-
Click the name of the queue that you need to use the calendar for
-
Click OPENING HOURS (in the top-right corner)
-
In Exceptions from Schema, add the calendar to the queue, for example, select yearly teambuilding and click
If you want to test that the calendar’s announcement on closure will be played instead of the normal announcement on closure, you can temporarily add today's date to the calendar, and then call a queue that uses the calendar. The queue will close. We recommend that you use a test queue for that.
For more information regarding opening hours, see Set up opening hours on queues
Dette er hjælp til Zylinc version 6.5. Du kan vælge hjælp til andre versioner her.
© 2021 Zylinc A/S • Ansvarsfraskrivelse
Zylinc unified help har vundet UK Technical Communication Awards 
Hjælpeversion: 24 februar 2021 15:41:38
Del denne side med andre: