![]() Kun slutbruger-hjælpen er for tiden oversat til dansk. Hjælp til installation og administration af Zylinc-løsninger er for tiden på engelsk.
Kun slutbruger-hjælpen er for tiden oversat til dansk. Hjælp til installation og administration af Zylinc-løsninger er for tiden på engelsk.
Dette emne er fortrinsvis for administratorer og/eller folk som bestyrer en Zylinc-løsning
If you need to make users’ calendar data available to the Zylinc solution, you can set up the Zylinc Exchange Sync Web Service to, among other things:
-
Use Zylinc clients to view calendar data and availability of users in your organization.
-
Use Zylinc clients to quickly insert absence appointments into users’ calendars, and to plan meetings.
-
Set up calendar-based forwarding rules to let your Zylinc solution set and remove forwards or do-not-disturb status on users’ phones based on calendar data. For example, the system can automatically forward a users’ phone to an alternative phone number while the user is in a meeting.
-
Set up spoken absence to let a robot answer users’ phones and—based on users’ calendar data—let callers know when the user will be back.
Zylinc Exchange Sync Web Service uses one or more synchronization user accounts, and one or more Windows services, to connect to one or more Exchange Web Services (EWS) APIs. It then copies relevant calendar data from users in your organization to the tables entry and entry_span in the ZyDB database.
The service is also in use when the system needs to update calendars, for example when you use the Insert absence function in Zylinc clients to create an entry in a user’s calendar. Technically, the service listens to the absence port, as specified in the Administration Portal and other parts of the system, for example Client Manager, and initiates a connection to the absence port, with a request to update the calendar.
For calendar synchronization, we generally recommend impersonation (see Task 2 in Set up calendar synchronization from Office 365 or Exchange Server in the following).
Impersonation is an authorization method that enables a single synchronization service account to access many accounts. When a service account impersonates users, it acts as the users and therefore assumes the rights that those users have.
If you prefer to use delegation, which is typically a more limited one-to-one or one-to-a-few user relationship, make sure that the delegation sync user has Editor permissions on Office 365/Exchange.
This is because the ability to inject absence set up in Zylinc clients into people's Office 365/Exchange calendars requires that the delegation sync user is able to read appointments as well as to create and modify them, and Editor permissions will ensure that.
When all relevant data in a users’ calendar has been copied, the synchronization service can use push subscription or streaming subscription to automatically be notified by the server if the data is changed in the future.
If a notification arrives, the synchronization service will update the copy of the calendar data in the ZyDB database with a very short delay, often within 30 seconds.
For local Exchange Servers, you can choose between push subscriptions or streaming subscriptions. For Office 365, streaming subscriptions is the only available option.
Push subscriptions need one open network port for callback per synchronization service on the Zylinc Windows Application Server. The callback port must be reachable from the local Exchange Server.
Streaming subscriptions don't need an open network port for callback.
If you can’t, or don’t want to, use push subscription or streaming subscription, the synchronization service can still receive updates to the copies of each users’ calendar data, but there will be a much longer delay between each update.
For example, it can take 30 to 90 minutes from when something is changed in a user’s calendar until the change is reflected in the copy of the data that's stored in the ZyDB database.
We refer to this way of receiving updates as incremental synchronization.
Incremental synchronization works like this:
When all relevant data in a users’ calendar has been copied, Zylinc Exchange Sync Web Service receives and stores a token for each users’ calendar folder.
When the incremental time interval after completion of the previous synchronization has passed, the synchronization service begins to check if the stored tokens for each users’ calendar folder still match the ones on the server.
If a stored token for a users’ calendar folder is different from the token on the server, the service will update the copy of that users’ calendar data in the ZyDB database.
Calendar synchronization can’t work for an indefinite time frame. This is because that, for example, recurring appointments would require an indefinite number of rows in the database tables.
Therefore, the system uses a concept of a sliding window: The synchronization service will delete past synchronized appointments from ZyDB that are older than the number of days you specify in NETWORK > Exchange Synchronization > Sync Days Backwards in the Administration Portal.
Similarly, the synchronization service will create synchronized appointments in ZyDB that occur in the future, within the number of days you specify in Sync Days Forward.
Each new day, past events need to be deleted and future events need to be added. This will happen at the time of day that you specify in Reload Time.
Local Exchange Servers and Office 365 use throttling policies.
Throttling policies help to ensure reliability and uptime, because the system can limit the amount of server resources that a single user or application can consume within a certain time frame.
When a resource’s limit is reached, the server begins to gradually slow down its response times. The server can even disconnect a user or application for a certain period of time.
Because of this, there's a limit on how many calendars you can synchronize per user account and per application. The limit depends on the amount of data in users’ calendars, and how often this data is updated. For example, more load occurs when a meeting request is sent to many recipients simultaneously.
| Exchange Server | Office 365 | |
| Push subscription | Adjustable throttling policy | Push notifications not available |
| Streaming subscription | Adjustable throttling policy |
Strict and non-adjustable throttling policy. Max. 10 concurrent connections per synchronization user account, with max. 200 users in each connection. You can’t expect each connection to use all 200 possible users. The practical limit is lower and depends on, for example, the time frame you synchronize, amount of data in users’ calendars, and data update frequency. Set up one service, with a separate synchronization user account, for each group of up to ca. 1500-2000 users. |
When you add extra synchronization services that use additional synchronization user accounts, you’ll get a bigger budget for the throttling policy.
To do that, add extra synchronization services that use separate synchronization user accounts, and set up user filters on each distinct synchronization service, to assign different groups of users for each service to handle.
For example, you can set up one synchronization service with a dedicated synchronization user account for one department in the company, and another synchronization service with a different synchronization user account for another department.
You can set up a filter to include or exclude users that each instance of the synchronization service will handle.
This is useful when you need to:
-
Split one Exchange Synchronization Web Service and its synchronization user account into several instances of the service, with separate synchronization user accounts, to work around throttling policies
-
Synchronize only a subset all users, to optimize the use of available Zylinc calendar synchronization licenses
In the Administration Portal, there's a user filter that can include or exclude users to synchronize based on, for example, the organizational unit, domain component, locality name, or country name from Active Directory.
This type of filter is called a field filter, and it works on the different sections of the user’s DN string.
In Active Directory, a user’s DN string is a sequence of relative distinguished names (RDN) connected by commas.
Example of an AD OU structure
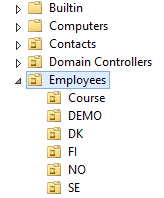
Example of a user’s DN string, for a user with the name demo3 in the organizational unit with the name DEMO in the illustration. Only organizational units are visible. That's why you can’t see demo3 user in the example.
CN=demo3,OU=DEMO,OU=Employees,DC=company,DC=com
A user DN string can consist of several parts, all starting with, for example, OU= or DC=, and separated by commas.
Because a user DN string is usually read from right to left, the first organizational unit level (OU1) in this domain is Employees. Employees is on the same level as Builtin, Computers, Contacts and Domain Controllers. The second level (OU2) in this example contains for example, Course, DEMO, DK, etc.
When you set up a filter for a sub-tree of organizational units, you can choose the level of organizational units that your filter should cover.
When you set up a field filter, for example for an organizational unit, you can enter a comma-separated list of several organizational units, as long as the organizational units are on the same OU level.
The filter criteria aren't case-sensitive.
In the following example, you'll set up a field filter to include users in a specific OU with the name Employees. Because field filters are recursive, users in subsidiary OUs will also be included, for example, Course, DEMO, DK, FI, NO, and SE.
To set up the field filter:
-
Log in to a domain controller as an AD administrator
-
Start PowerShell
-
To get the DN string for the organizational unit, type the following command in PowerShell:
get-adorganizationalunit -filter 'name -like "*employee*"'|select-object distinguishedname
Replace *employee* with a filter that matches the name of the relevant organizational unit in your organization.
To get a list of all organizational units in your organization, specify "*" as the -like criteria:
get-adorganizationalunit -filter 'name -like "*"'|select-object distinguishedname -
Make a copy of distinguishedname for the organizational unit. In this example, the string for the Employees OU is:
OU=Employees,DC=company,DC=com
The user DN string only contains only one part that begins with OU=. This means that you can set up a field filter with the following properties
-
Organizational unit level: OU1
-
Name of OU: Employees
-
-
In the Administration Portal menu, select NETWORK > Exchange Synchronization and click the Exchange Sync that you want to use the filter on
-
In Sync Filtering, select Field filter
-
In Sync Settings, Users to sync, select OU1 - Organizational Unit Name and select Includes. Then type Employees in the box. Make sure to select Right to Left.
Most often Active Directory is structured in such a way that an organization is read from right to left.
Right to left means that OU1 is the part of the user DN string that starts with OU= when reading the string from right to left. -
Click Save
Let’s look at another field filter example for the Course organizational unit that is a subsidiary of Employees. This example uses a filter at OU level 2:
To get the DN string for the organizational unit, type the following command in PowerShell:
get-adorganizationalunit -filter 'name -like "*Course*"'|select-object distinguishedname
The command returns:
OU=Course,OU=Employees,DC=company,DC=com
More than one part of the user DN string begins with OU=
-
OU1 is Employees
-
OU2 is Course
Example: Set up a filter for the Course organizational unit
In Sync Settings, Users to sync, select OU2 - Organizational Unit Name and select Includes and type Course in the box. Make sure to select Right to Left.
There's a user filter that can include or exclude users to synchronize, based on AD group memberships.
-
Create an AD group, or use an existing group for the filter.
-
Check that the users you want to filter are members of the group.
-
In the Administration Portal menu, select NETWORK > Directory Settings and click Reinitialize.
-
Log out of the Administration Portal to refresh the user and group cache.
-
In the Administration Portal menu, select NETWORK > Exchange Synchronization and click the Exchange Sync that you want to use the filter on.
-
In Sync Filtering, (in the Sync Settings section), select Group/user filter.
-
In Available User/Groups, select the AD group, and add that group to Selected User/Groups. Make sure you select Include.
-
To use calendar synchronization from Exchange Server or Office 365, first set up Active Directory integration
-
In the Administration Portal menu, select USERS > ZyDesk Users
-
Check that the users, for whom you're going to add calendar synchronization, are visible in the list. If users are missing from the list, make sure that Active Directory sync works correctly. Use the link in step 1 to set up AD synchronization to include the missing users.
-
Verify that you have one synchronization user per ca. 1500-2000 users that you're going to synchronize. If you don’t have enough synchronization users, ask an administrator of the Exchange Server or Office 365 environment to create them before you continue. You're going to need synchronization user accounts (similar to e-mail addresses) and passwords for all synchronization user accounts.
-
Impersonation is an authorization method that enables a single synchronization service account to access many accounts. When a service account impersonates users, it acts as the users and therefore assumes the rights that those users have.
Ask the administrator of the Exchange Server or Office 365 environment to set up permissions for the synchronization user account(s) to impersonate those users in your organization, whose calendar data you want to make available to the Zylinc solution.
Create a separate AD group, and use the group to impersonate each of the chunks of 1500-2000 specific users that each of the synchronizations user accounts is going to handle. Make sure that no single user can be impersonated by more than one synchronization user account.
If your organization contains confidential information in certain users’ calendars, skip those users when you set up impersonation and calendar synchronization. It's a complex task to set up privacy settings, especially in cases where you have more than one calendar synchronization service or synchronization user account. If you decide to include users with confidential calendar information in the impersonation group(s), make sure that you apply and maintain correct Privacy Settings to all your individual synchronization services.
Information about how to set up and use impersonation is a well documented topic on the internet. You can use these links:
-
In the Administration Portal menu, select INSTALL > Portal Configuration
-
In the Network category, select Exchange Sync and click Save
-
In the Administration Portal menu, select NETWORK > Exchange Synchronization
-
If an Exchange Sync already exists, click the Add Exchange Sync link below the sync list, otherwise continue to the next step.
-
In Windows Service Name, enter a name for this instance of the synchronization service, for example: All users
-
In Server Address, enter the host name or IP address of the Zylinc Windows Application Server, for example: winappserver
-
In Exchange Service URL:
- If you use Office 365, enter https://outlook.office365.com/EWS/Exchange.asmx
- If you use Exchange Server, enter an URL similar to: https://<exchange server name or ip>/EWS/Exchange.asmx, for example: https://exchcas01/EWS/Exchange.asmx
-
In Domain, enter the name of the domain, for example: company.com
-
In Sync User and in Password, enter the user name and password for the synchronization user account, for example: exchsyncsvc@company.com and the password
-
In Exchange Version:
- If you use Exchange Server, select Exchange 2013. For Exchange 2016, select Exchange 2013 because both versions use the same version of the EWS protocol.
- If you use Office 365, select Office 365
-
In Synchronization Method:
-
If you use Office 365, select Streaming subscriptions
-
If you use Exchange Server, select Push subscriptions, and in Callback URL, enter an URL similar to http://<winappserver>:35098/Notification
Subtract 1 from the port number for each additional synchronization service that uses push notifications, to make sure that each service uses a unique port on the Zylinc Windows Application Server.
Example: If you add an additional synchronization that uses push subscriptions, use an URL similar to http://<winappserver>:35097/Notification
-
-
In Sync Settings, Sync Filtering, select Group/user filter
-
In Available User/Groups, select the AD group that impersonates the users for the account you entered in Sync User, and add that group to Selected User/Groups. Make sure you select Include.
-
Click Save
If you use Office 365 and have more than one synchronization user account, repeat the steps to add additional Exchange Syncs for each of your synchronization user accounts.
If you use a mix of Exchange Servers and Office 365, or if you use more than one Exchange Server installation, for example if you currently migrate from an old version to a newer, add an additional Exchange Sync for each Exchange client access server (CAS server).
For more information, see Best practice for hybrid deployment or multiple Exchange servers
-
In the Administration Portal menu, select CLIENTS > Appointment Categories
-
If you don’t see any categories, click Add Defaults and click Save
IMPORTANT: In recent Zylinc versions (from 6.5u4.12), we've seen problems when users tried to deploy Exchange Sync Web Service with the Deployment Manager, as described in the following. For those recent versions, we recommend that you use the tool ExchangeSyncWSConfigurator instead.
You find the tool on the Zylinc Application Server, in C:\Program Files\Zylinc\ExchangeSyncWS\<version>\ExchangeSyncWSConfigurator.exe.
-
In the Deployment Manager menu, select Deployment > Installation
-
In Installers, select Exchange Sync. WS and click Install Applications
-
In the Deployment Manager menu, select Application Administration > Exchange Sync Deployment
-
Select the name of the instance of the synchronization service you previously created
-
In Version to deploy, select the newest version
-
Click Deploy Services
-
In the Deployment Manager menu, select Deployment > Windows Services
-
Select the instance of the synchronization service
-
In Change Startup Type, select AutomaticDelayed and click Change Startup Type
-
Select the instance of the synchronization service
-
Click Start Services
If you have more than one Exchange Sync service, repeat the steps for the rest of the services.
-
In Outlook, create a new appointment in a user’s calendar.
-
If you use subscription, the appointment should normally be synchronized within 30 seconds. Otherwise, wait for the amount of time that you've entered in Incr. timer for the Exchange synchronization service that handles the user’s calendar.
-
ZyDesk may cache calendar data for a number of minutes. To quickly update data for this test, close ZyDesk if it’s is running, and log in to ZyDesk again.
-
In ZyDesk, search for the user, and check that you can see the appointment in time overview or in calendar details for the user.
-
In Outlook, open the appointment and change the start time.
-
Repeat steps 2-5 to check that the appointment has been updated.
If you can’t see the appointment, or if the appointment hasn’t been updated when you carried out step 6, you can open the log file for the relevant Exchange synchronization service, and search for lines in the log file that contain the words error or exception. You can also search for the e-mail address of the user. The log file should contain information regarding errors that that may prevent the synchronization from working.
-
Start SQL Server Management Studio, and connect to the SQL Server that hosts ZyDB.
-
Click New Query.
-
Copy the SQL code from this file SQL_script_to_display_exchange_sync_web_service_status.txt to the SQL Query window.
-
If you didn’t use the name ZyDB for your database, edit the first line to match the name that you've used for your database.
-
Click Execute to run the script.
-
You should see a script output similar to this:
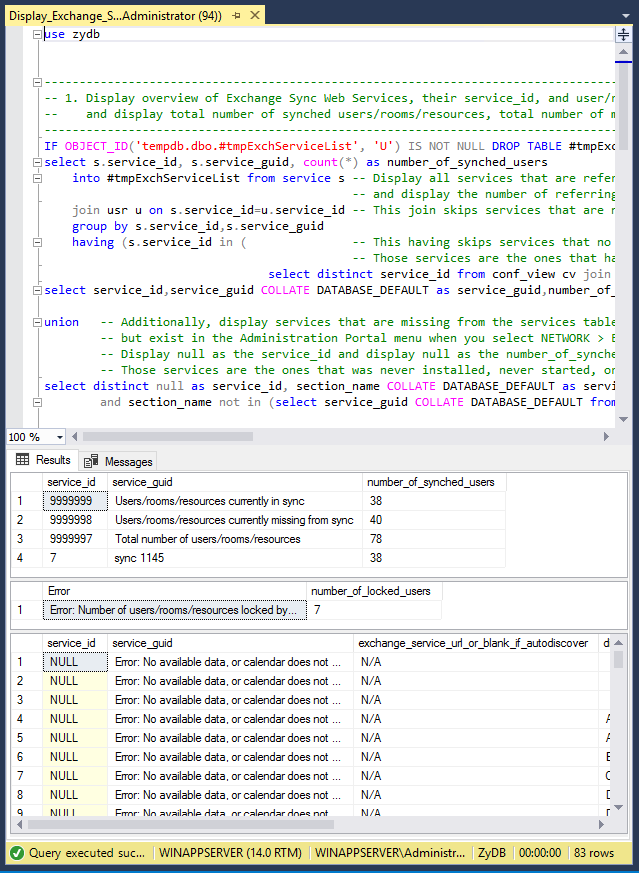
The script returns two or three grids below the query itself:
The counter Users/rooms/resources currently in sync shows how many users, rooms, or resources are currently synchronized correctly. Number_of_synched_users should match the number of calendars that you want to synchronize.
The counter Users/rooms/resources currently missing from sync shows how many users, rooms, or resources that currently don't have synchronized calendar data for, for example because ...:
-
You didn't install or start a Windows service for the Exchange sync that's supposed to handle such a user, room, or resource.
To resolve: Make sure that you followed the procedure in Set up calendar synchronization from Office 365 or Exchange Server.
-
The Windows service that's supposed to handle such a user, room, or resource isn't started.
To resolve: If the service stops shortly after being started, open the latest log file for the service (see Open latest log file from specific Zylinc module), and search for lines that contain the words error or exception. Such lines often contain descriptions of the error that stopped the service.
-
Such a user, room, or resource doesn't have a calendar folder.
-
The sync user doesn't have permission to read data from the calendar of such a user, room, or resource.
-
You don't have enough licenses for your Zylinc calendar synchronization service.
Additionally, you can view all the Exchange syncs from the Administration Portal in the top grid:
- If you see a number in the service_id column next to a service from the Administration Portal it means that:
This service is installed and started
This service has, at some point in time, returned calendar data for a user, room, or resource.
If you see NULL in the service id column, it means that:
You didn't install or start a Windows service for the Exchange sync that's supposed to handle such a user, room, or resource.
To resolve: Make sure you followed the procedure in Set up calendar synchronization from Office 365 or Exchange Server.
The Windows service that's supposed to handle such a user, room, or resource isn't started.
To resolve: If the service stops shortly after being started, open the latest log file for the service, (see Open latest log file from specific Zylinc module) and search for any lines that contain the words error or exception. Such lines often contain descriptions of the error that stopped the service.
Such a user, room, or resource doesn't have a calendar folder.
The sync user doesn't have permission to read data from the calendar of such a user, room, or resource.
You don't have enough licenses for your Zylinc calendar synchronization service.
- Number_of_synched_users shows how many users, rooms or resources are currently handled by the sync.
The middle grid only appears if you have an error.
If you see an error message similar to Error: Number of users/rooms/resources locked by <deleted service>..., do the following:
- In the Deployment Manager menu, select Application Administration > Exchange Sync Deployment
- Click Release all users from un-configured services
- Restart all Exchange sync services
The grid in the bottom of the screen displays an individual status for all users, rooms, or resources:
-
Ok: Mapped to <name of Exchange Sync> means that the user, room, or resource is currently handled by the service in question.
-
Error: This user/room/resource refers to a deleted Exchan... means that the user, room, or resource is currently handled by a service that's been deleted. When that's the case, the user, room, or resource is locked in an error state.
To resolve:
- In the Deployment Manager menu, select Application Administration > Exchange Sync Deployment
- Click Release all users from un-configured services
- Restart all Exchange sync services
-
Error: No available data, or calendar does not exist, or no perm... means:
- The user, room, or resource doesn't have a calendar folder
- The sync user doesn't have permission to read data from the calendar of the user, room, or resource
- You don't have enough licenses for your Zylinc calendar synchronization service
A hybrid deployment is when an organization uses an on-premise Exchange Server and Office 365 at the same time. When that's the case, some user information is hosted on-premise, and some in Office 365.
A hybrid deployment can also serve as an intermediate step, when an organization moves from on-premise Exchange Server to Office 365.
A similar situation exists, if you use multiple installations of Exchange Servers, for example if you're in the process of upgrading to a newer Exchange Server version.
If you use a hybrid deployment, or if you use multiple Exchange Servers, create impersonation AD groups so that, for example, Syncuser 1 can only impersonate users in impersonation group 1 and so on, like in this example:
| All users |
|
|
|
Impersonation group 1 |
Impersonation group 2 |
Impersonation group n |
|
| Syncuser 1 |
|
||
| Syncuser 2 |
|
||
| Syncuser n |
|
This will effectively prevent a synchronization service with a specific synchronization user account from being able to read data from other groups of users. It stops each synchronization service, to compete for the same user.
There is a disadvantage, however: You need to manually update the impersonation AD group memberships, when you move a users’ information store to another Exchange Server or to Office 365.
Dette er hjælp til Zylinc version 6.5. Du kan vælge hjælp til andre versioner her.
© 2021 Zylinc A/S • Ansvarsfraskrivelse
Zylinc unified help har vundet UK Technical Communication Awards 
Hjælpeversion: 24 februar 2021 15:41:38
Del denne side med andre: