
The Zylinc Cisco integration is useful when you use Cisco devices (Cisco desktop phones or Jabber softphones), and the Cisco devices are controlled by Cisco Unified Communications Manager (CUCM).
-
Agents can use their Cisco devices to answer calls from Zylinc queues.
-
You can view real-time line state information from Cisco in the Zylinc software.
-
Call control lets agents answer calls with keyboard shortcuts (or a mouse click) on their computers, without having to reach out for the answer buttons on their phones or headsets.
-
Automatic mapping between Zylinc users in the Zylinc database and Cisco users, their phone numbers, and their phone devices.
-
Support for Cisco Extension Mobility means that agents can log in to any available phone at any available seat and then use that phone to receive calls from Zylinc queues.
-
Users can set or remove forwards from their computers, instead of having doing it on their phones.
-
Additional Call Control features, for example dial, answer, hang-up, hold, resume, redirect, transfer, send DTMF keypresses, and call breaking through a forward.
-
Support for Call Manager clusters. For example, you can have a publisher and a subscriber Call Manager installed at the same time.
Various Cisco APIs (JTAPI, AXL and EM) provide the information needed to integrate between Zylinc and Cisco. Since JTAPI uses Java, the related Zylinc modules also use Java, hosted by an instance of the Apache Tomcat web server that uses Java as well.
The system retrieves line state for a user by a direct JTAPI connection to the user’s device (usually a desktop phone or a Jabber softphone). In order to find the device and correctly connect to it, the system creates a mapping table between ZyDesk users, Cisco users, their phone numbers, and their devices. That's why the following limitations exist:
-
To show any line state for a Cisco user, you must associate the user's devices to the user's end user profile. If the user has more than one extension, the primary extension must be set on the end user profile.
-
All devices must be added to Zylinc application user
-
If you need line state from phone numbers without an associated user, the phone numbers must be unique across all Call Managers and partitions, and you must enter a default partition in Administration Portal > NETWORK > Cisco Interworking > Default partition.
-
Phones must have support for CTI to show line state. Models without CTI support, such as Cisco 3905, require the installation and configuration of the extra module SIP User Proxy to show line state. Call control isn't supported for phones without CTI support.
In some environments, data in the Cisco User ID fields may be inconsistent. For example, domain aliases match the user IDs for some users, and phone numbers match the user IDs for others. However, if you created users manually, some user IDs may not match any directory field value at all.
If the values of Cisco User IDs are inconsistent, you must rename some or all of the users. All Cisco User IDs must consistently match exactly one field in the directory. This is relevant in the following cases:
- Cisco User ID values were entered manually.
- You don't use Cisco LDAP synchronization.
- You have previously merged several domain directories or Cisco environments into one.
To install and configure the Cisco integration, you must first complete a base installation of the Zylinc system.
- Follow the steps described in Install a Zylinc solution from scratch
- When ready, complete the following tasks to add support for Cisco.
The Cisco integration can't create Zylinc users in the Zylinc database. It can only map existing users from the Zylinc database to Cisco users. That's why you need to verify that the Cisco users already exist in the system:
-
In the Administration Portal menu, select USERS > ZyDesk Users
-
Verify that all the Cisco users are visible in the ZYDESK USERS list.
If you can’t see all Cisco users, you must install and configure the Directory Server module to import the Cisco users from Active Directory, an LDAP Directory, or a CSV file into the Zylinc system. All Cisco users must exist in the Zylinc database before you can continue with the following tasks.
- Log in to the Cisco Unified CM Administration (CCMAdmin) web page. (Typical user name: ccmadmin)
- Select User Management > User Settings > Access Control Group
- Click Add New to create a new access control group with the name Zylinc, and click Save.
- In the Related Links box in the top right corner, select Assign Role to Access Control Group, and click Go
- Click Assign Role to Group
- Click Find
- Select the following eight roles:
Standard AXL API Access
Standard CCM Admin Users
Standard CTI Allow Control of All Devices
Standard CTI Allow Control of Phones supporting Connected Xfer and conf
Standard CTI Allow Control of Phones supporting Rollover Mode
Standard CTI Enabled
Standard EM Authentication Proxy Rights
Standard SERVICEABILITY Read Only (under SERVICEABILITY)
- Click Add Selected, and save your changes.
A Cisco application user with certain permissions in the Cisco environment is required for the APIs to work. The application user must own all devices.
-
Log in to the Cisco Unified CM Administration (CCMAdmin) web page. (Typical user name: ccmadmin)
-
Select User Management > Application User
-
Click Add New to add a new application user with the user id: Zylinc
-
Compose/create a new password for the Zylinc user and write it down
-
Enter the password
-
Enter the same password in the Confirm Password field
-
Click Add to Access Control Group
-
Select the access control group with the name Zylinc (created previously)
-
Click Add Selected, and save your changes
-
Verify that Roles matches the list of roles you selected previously
- Log in to the Cisco Unified CM Administration (CCMAdmin) web page. (Typical user name: ccmadmin)
- Select User Management > Application User
- Click Find
- Click the application user with the name Zylinc (created previously)
- Click Device Association
- Click Find
- Select all devices that should monitored
- Click Save Selected/Changes
- In the Related Links box in the upper right corner, select Back to User and Click Go
- Add all of the Available Profiles to the list named CTI Controlled Device Profiles, and save your changes
Cisco JTAPI requires the java library file jtapi.jar in the lib directory of the Apache Tomcat web server instance. There is no need for other files. Follow these steps to obtain a copy of the correct version of the jtapi.jar file:
-
Log in to a remote desktop session on the Zylinc Windows application server
-
Log in to the Cisco Unified CM Administration (CCMAdmin) web page. (Typical user name: ccmadmin)
-
Click About in the top right corner
-
Select the text that contains the system version (example: 11.0.1.20000-2), and copy the version number
-
Open the C:\Zylinc install folder
-
Create a subfolder with the name JTAPI followed by the system version
Example: C:\Zylinc install\JTAPI 11.0.1.20000-2
-
Select Application > Plugins
-
Click Find
-
Click the Download link for Cisco JTAPI 64-bit Client for Windows, and save the file
-
Run the file CiscoJTAPIx64-Windows.exe to install JTAPI on the Zylinc Windows application server. If you don't want to install it on the Zylinc Windows application server, you can install it on another 64-bit Windows computer.
-
Complete the installation process.
-
Copy the file C:\Program Files\Cisco\JTAPI64Tools\lib\jtapi.jar to the JTAPI-version folder that you previously created
Example: C:\Zylinc\install\JTAPI 11.0.1.20000-2\jtapi.jar
-
If you don't want to keep the Cisco Unified Communications Manager JTAPI 64-bit Client, you can remove it
Follow these steps to add the java library file (jtapi.jar) that you previously extracted to the Tomcat instance:
-
On the Zylinc Windows Application server, start Deployment Manager
-
In the menu, select Application Administration > Apache Tomcat Administration
-
Select ZyTomcat1-8080-8443
-
Click Add to add a shared library
-
Select the jtapi.jar file that you previously extracted and saved
Example: C:\Zylinc install\JTAPI 11.0.1.20000-2\jtapi.jar
-
Click Save instance
-
In the menu, select Deployment > Windows Services
-
Restart ZyTomcat1-8080-8443
-
In the Administration Portal menu, select SYSTEM > Interface Configuration
-
Enter the following URL into Cisco User Proxy
http://<WinAppServer>:8080/CiscoUserProxy/
Replace <WinAppServer> with the IP address or hostname of the Zylinc Windows Application Server)
Example: http://WinAppServer:8080/CiscoUserProxy/
-
Click Save
- In the Administration Portal menu, select INSTALL > Portal Configuration
- Select Cisco
- Save
- In the Administration Portal menu, select NETWORK > Cisco Interworking
- Select Auto Start
- Select Enable User Deletion
- In User Refresh Interval, enter 600
- In User Sync Start Time, enter 02:00
-
Select Auto Start.
-
Clear Enable Third Party Call Control.
-
Enter the following URL into User Proxy Address. Note that it is not identical to the URL that you previously entered.
http://<WinAppServer>:8080/
Replace <WinAppServer> with the IP address or hostname of the Zylinc Windows application server.
Example: http://WinAppServer:8080/
-
In the Default partition field, enter a name that is not in use for any existing partition. We recommend the name zypartition.
-
Leave Flat Address pattern blank (optionally enter a regex expression for normalization of phone numbers).
-
Click Save.
Many Cisco installations have more than one Call Manager. In many cases, a publisher as well as a subscriber Call Manager exists.
In this example, you'll add two providers:
- A CUCM publisher with the name ProviderCUCMPublisher and IP address 192.168.1.100
- A CUCM subscriber with the name ProviderCUCMSubscriber and IP address 192.168.1.101
Follow these steps to add the first provider:
- In the Administration Portal menu, select NETWORK > Cisco Interworking
- Click Add Cisco Provider Config
- In Provider configuration name, enter ProviderCUCMPublisher
-
In Host Url, enter the following URL:
https://192.168.1.100:8443/axl
Replace 192.168.1.100 with the IP address or hostname of your publisher Call Manager
-
In Username, enter Zylinc (the application user that we previously created)
-
In Password, enter the password of the Zylinc application user
-
In version, enter the version of the Call Manager. The format should be xx.x (example: 11.5 )
-
In Page Size, enter 30000
-
In Host address, enter 192.168.1.100
Replace 192.168.1.100 with the IP address or hostname of your publisher Call Manager
-
In Port, enter 8080
-
In Username, enter zylinc (the application user that we previously created)
-
In Password, enter the password of the Zylinc application user
-
In CUCM Address, enter 192.168.1.100
Replace 192.168.1.100 with the IP address or hostname of your publisher Call Manager
-
In Username, enter zylinc (the application user that we previously created)
-
In Password, enter the password of the Zylinc application user
-
Click Save
Repeat task 9 to add the next Call Manager (the CUCM Subscriber), but change the following settings:
- Change Provider configuration name to ProviderCUCMSubscriber
- Use the IP address or hostname of your CUCM Subscriber instead of 192.168.1.100, for the three settings that contain Call Manager IP address or hostname.
In Call Manager, create a SIP Trunk that Media Server can use to call Cisco extensions and external phone numbers.
- Log in to the Cisco Unified CM Administration (CCMAdmin) web page. (Typical user name: ccmadmin)
- Select Device > Trunk
- Click Add New
- In Trunk Type,select SIP Trunk
- In Device Protocol, select SIP
- In Trunk Service Type, select None (default)
- In Device Name, enter Zylinc
- In Device Pool, enter the value provided by the customer, normally Default
- In Call Classification, select OnNet
- Select Media Termination Point Required
- In Calling Search Space, enter the information provided by the customer
- Select Redirecting Diversion Header Delivery - Inbound
- Check Redirecting Diversion Header Delivery – Outbound
- In Destination Address, enter the IP address or fully qualified DNS name of the Media Server
- In Port, enter 5060
- In SIP Trunk Security Profile, select Non Secure SIP Trunk Profile
- In SIP Profile, select Standard SIP Profile
- In Rerouting Calling Search Space, enter the information provided by the customer: Default value: None
- In DTMF Signaling Method, select RFC 2833
- Click Save
- Click Reset
Route patterns are useful when Zylinc features need a phone number. For example, the following features rely on phone numbers:
- Personal queues
- IVR menus
- Agent IVR login
- Agents with Zylinc internal softphones
- Announcement recording
Those phone number ranges must be routed to the Media Server
- Log in to the Cisco Unified CM Administration (CCMAdmin) web page. (Typical user name: ccmadmin)
- Select Call Routing > Route/Hunt> Route Pattern
- Click Add New
- In Route Pattern, enter the pattern for reaching Zylinc extensions (queue, ivr , etc), for example 1XXX.
- In Route Partition, enter the information provided by the customer, normally None
- In Gateway/Route List, select Zylinc
- In Call Classification, select OnNet
- Clear Provide Outside Dial Tone
- Click Save
- In the Administration Portal menu, select INSTALL > Portal Configuration
- Select SIP Trunks
- Save
- In the Administration Portal menu, select SYSTEM > SIP Trunks
- Click Add SIP Trunk
- In SIP Trunk Name, enter a name, for example Cisco
- In Host, enter the Call Manager IP Address
- Click Save
- In the Administration Portal menu, select SYSTEM > User Directory.
- In Shortnumber length, select the length of the longest shortnumber in use (typical value for Danish numbers: 7).
- In Default Country Code, for single country installations enter the country code (for example 45 for Denmark). For multi-country installations, enter 45 because a value is mandatory, and the country code doesn't matter in this case.
- In Prefix, enter + (that’s a plus).
- In External Line Prefix, enter 0 if 0 is required as prefix for outgoing calls. Otherwise leave the field blank.
- In Primary PBX select Cisco.
- In Default Agent Phone select Short Number.
- Save.
- In Deployment Manager, select Deployment > Tomcat Services
- In Instance, select ZyTomcat1-8080-8443
- In Available Tomcat applications, select Cisco Directory Sync
- Click Deploy Services
- In Available Tomcat applications, select Cisco User Proxy
- Click Deploy Services
In some environments, data in the Cisco User ID fields may be inconsistent. For example, domain aliases match the user IDs for some users, and phone numbers match the user IDs for others. However, if you created users manually, some user IDs may not match any directory field value at all.
If the values of Cisco User IDs are inconsistent, you must rename some or all of the users. All Cisco User IDs must consistently match exactly one field in the directory. This is relevant in the following cases:
- Cisco User ID values were entered manually.
- You don't use Cisco LDAP synchronization.
- You have previous merged several domain directories or Cisco environments into one.
We suggest you start by trying Alternative A in the following. It is a script that can often directly guess the best mapping to use, by inspecting the existing users in the database.
If Alternative A does not work for you, or if you prefer to manually find the best mapping to use, use Alternative B.
This SQL script is helpful for counting the number of possible mapped users, based on each possible mapping column:
- Open SQL Server Management Studio
- Connect to the SQL server that hosts ZyDB
- Click New Query
- Copy/paste this SQL code into the query window, and replace the second word ZyDB with the name of your ZyDB database.
Use ZyDB select 'Alias', count(*) from usr_workset as uw join usr_type as ut on uw.usr_type_id=ut.usr_type_id join vtm_user as uv on uw.alias = uv.user_id where ut.name='Person' union select 'Display Name', count(*) from usr_workset as uw join usr_type as ut on uw.usr_type_id=ut.usr_type_id join vtm_user as uv on uw.Display_name = uv.user_id where ut.name='Person' union select 'Email Address', count(*) from usr_workset as uw join usr_type as ut on uw.usr_type_id=ut.usr_type_id join vtm_user as uv on uw.smtp_address = uv.user_id where ut.name='Person' union select 'Fax Number', count(*) from usr_workset as uw join usr_type as ut on uw.usr_type_id=ut.usr_type_id join vtm_user as uv on uw.Fax_phonenumber COLLATE DATABASE_DEFAULT = uv.user_id where ut.name='Person' union select 'Home Number', count(*) from usr_workset as uw join usr_type as ut on uw.usr_type_id=ut.usr_type_id join vtm_user as uv on uw.Home_phonenumber COLLATE DATABASE_DEFAULT = uv.user_id where ut.name='Person' union select 'Initials', count(*) from usr_workset as uw join usr_type as ut on uw.usr_type_id=ut.usr_type_id join vtm_user as uv on uw.Initials = uv.user_id where ut.name='Person' union select 'Lync Phonenumber', count(*) from usr_workset as uw join usr_type as ut on uw.usr_type_id=ut.usr_type_id join vtm_user as uv on uw.Lync_phonenumber COLLATE DATABASE_DEFAULT = uv.user_id where ut.name='Person' union select 'Mobile Number', count(*) from usr_workset as uw join usr_type as ut on uw.usr_type_id=ut.usr_type_id join vtm_user as uv on uw.Mobile_phonenumber COLLATE DATABASE_DEFAULT = uv.user_id where ut.name='Person' union select 'NT Account',count(*) from usr_workset as uw join usr_type as ut on uw.usr_type_id=ut.usr_type_id join vtm_user as uv on uw.Nt_Account = uv.user_id where ut.name='Person' union select 'NT Domain', count(*) from usr_workset as uw join usr_type as ut on uw.usr_type_id=ut.usr_type_id join vtm_user as uv on uw.Nt_Domain = uv.user_id where ut.name='Person' union select 'Office Number', count(*) from usr_workset as uw join usr_type as ut on uw.usr_type_id=ut.usr_type_id join vtm_user as uv on uw.Office_phonenumber COLLATE DATABASE_DEFAULT = uv.user_id where ut.name='Person' union select 'Pager Number', count(*) from usr_workset as uw join usr_type as ut on uw.usr_type_id=ut.usr_type_id join vtm_user as uv on uw.Pager_phonenumber COLLATE DATABASE_DEFAULT = uv.user_id where ut.name='Person' union select 'Short Number', count(*) from usr_workset as uw join usr_type as ut on uw.usr_type_id=ut.usr_type_id join vtm_user as uv on uw.Short_phonenumber COLLATE DATABASE_DEFAULT = uv.user_id where ut.name='Person'
- Click ! Execute (or F5) to execute the SQL query
-
The script outputs information, and typically the mapping with the highest number is the best one to use, especially if the number is identical to (or close to) the total number of Cisco users.

- In the Administration Portal menu, select SYSTEM > User Directory
- In Cisco PBX ID Mapping, select the mapping that showed the biggest number in the previous step
- Click Save
- Click Format Users
- Log in to the Cisco Unified CM Administration (CCMAdmin) web page. (Typical username: ccmadmin)
- Select User Management > End Users
- Click Find. You should see a list of User IDs, like this:
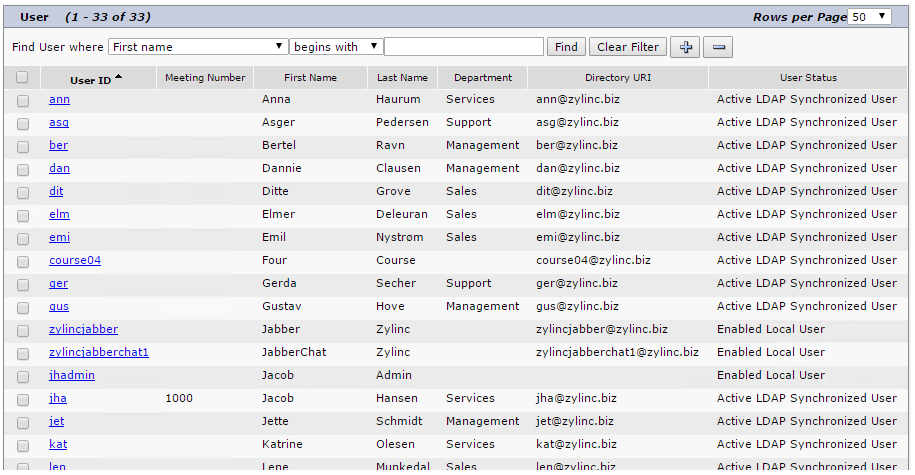
- Keep the window open. You will need the list of User IDs for completing the following steps
- Open SQL Server Management Studio
- Connect to the SQL server that hosts ZyDB
- Click New Query
- Copy/paste this SQL code into the query window, and replace the second word ZyDB with the name of your ZyDB database.
Use ZyDB select Display_name as 'Display Name', alias as 'Alias', smtp_address as 'Email Address', Fax_phonenumber as 'Fax Number', Home_phonenumber as 'Home Number', Initials as 'Initials', Lync_phonenumber as 'Lync Phonenumber', Mobile_phonenumber as 'Mobile Number', Nt_Account as 'NT Account', nt_domain as 'NT Domain', Office_phonenumber as 'Office Number', Pager_phonenumber as 'Pager Number', short_phonenumber as'Short Number' from usr_workset as uw join usr_type as ut on uw.usr_type_id=ut.usr_type_id where ut.name='Person'
- Click ! Execute (or F5) to execute the SQL query
-
You should see a grid similar to this one:
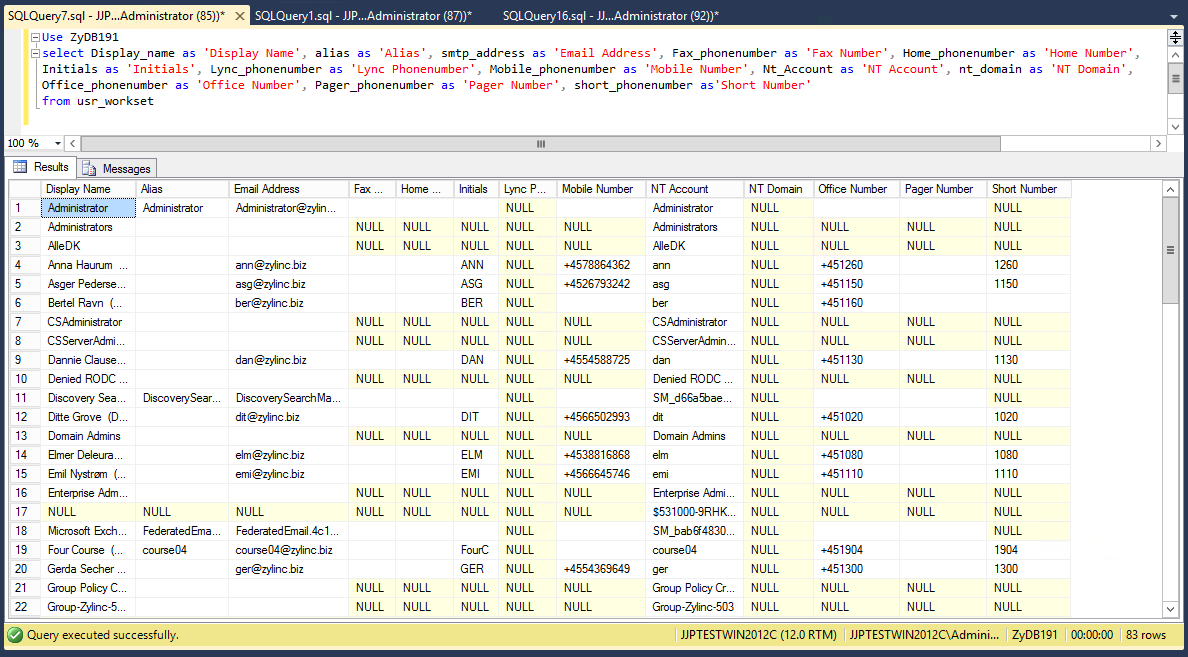
- Arrange the two windows next to each other, and inspect the SQL columns returned by the query.
- Find the column that best matches the Cisco User IDs. Uppercase or lowercase doesn't matter. In the screenshot, it seems like both the two columns NT Account and Initials matches. However, if you look at row 19 (the user named Four Course), only the NT Account looks like a good match, and in this case the mapping between users in the Zylinc database and Cisco users should be NT Account.
- If you can’t map all of the users you need based on one mapping column, you'll need to rename the Cisco User IDs for the users with a missing map. If needed, you should do that now, and then repeat the mapping steps.
- In the Administration Portal menu, select SYSTEM > User Directory
- In Cisco PBX ID Mapping, select the mapping that you figured out in the previous steps
- Click Save
- Click Format Users
When you have formatted users, do the following:
- Run the Troubleshoot user mapping issues with SQL Script
- Inspect the first column for errors. Some errors are OK for service users or manually created test users and so on. No real users should show errors.
Test that the Media Server is able to call/reach a Cisco user's phone number. This is not the same as calling one phone from another phone on the PBX. Instead, we use the ZyDesk Internal Softphone to create the test call via Media Server and the relevant SIP trunk:
- In the Administration Portal menu, select USERS > Agents
- Click the user ZyDesk Administrator
- Change Agent - Incoming Calls, Device to Internal (you must clear the Default checkbox to be able to change this value)
- Log in to ZyDesk with the ZyDesk Administrator user
- Use ZyDesk to call a Cisco user's phone number. Verify that the phone rings. This means that the Media Server is able to call the agent's specific phone number via a SIP trunk on the Media Server.
Test that all Cisco users have line state. In many cases, such as when installing a new customer, only one user (ZyDesk Administrator) may exist and be able to start ZyDesk. We only have this user available to view line state on other users. However, ZyDesk can't view primary line state across different PBX types, and because the ZyDesk Administrator is on its own PBX type that uses internal softphone, this user can't display, for example, Cisco or BroadWorks line state, unless we change the “operator" part of the ZyDesk Administrator to use the same PBX type.
- In the Administration Portal menu, select USERS > Agents
- Click the user ZyDesk Administrator
- Clear the Default checkbox for ZyDesk Administrator User (Operator) Device
- Change ZyDesk Administrator User (Operator) Device to Cisco
- Now the ZyDesk Administrator is on the same phone type. When you log in to ZyDesk with ZyDesk Administrator, you should now be able to verify that line state is displayed next to all Cisco users.
- In the Administration Portal menu, select USERS > ZyDesk Profiles
- Find a profile with the name Operator (if it's not there, Use Deployment Manager to upload it)
- Click the Operator profile, and add one of the Cisco users to be Included
- If the user is not enabled for ZyDesk access, select Create on save
- Log in to ZyDesk with the user you just added to the Operator profile
- Call the Cisco phone number that belongs to the user.
- The incoming call should be visible in ZyDesk Operator for the user. Use the mouse (since keyboard shortcuts may be unmapped or unknown at this point) and click the answer button in ZyDesk. The call should be answered automatically.
When Cisco Directory Sync starts up, the following sequence will happen.
-
Add new or missing Cisco User IDs to the vtm_user table in the ZyDB database
-
Optionally delete Cisco User IDs from the vtm_user table if they (no longer) exist in Call Manager
-
Add new or missing devices to the vtm_user_controlled_device table in the ZyDB database
-
Create mapping (database relations) between Zylinc users in the ZyDB database, Cisco user IDs in Call Manager, Cisco phone numbers, and Cisco devices. This includes Extension Mobility.
After the startup sequence, the Cisco Directory Sync will enter the normal running state and do the following:
-
Update user-to-device mapping in real time when users log in/out of Extension Mobility or change their seats.
-
At every user refresh interval: Update the user-to-device mapping and optionally add new devices.
-
Once daily, when the user sync start time occurs: Do a full user sync similar to when the service starts. All user data and all device information is completely refreshed.
If the Cisco Directory Sync service stops, the system will fail to recognize when users log in or out of Extension Mobility or change their seats. The system will also fail to recognize changed user-to-device mappings, and new users or deleted users will not be updated in the ZyDB database.
When Cisco User Proxy service starts up, the following sequence will happen:
-
All mapped devices are queried, and all users in the Zylinc database with a known Cisco device will have their line state updated. This may take some time depending on the number of users. Durations of 15 minutes or longer aren't uncommon.
After the start up sequence, the Cisco User Proxy will enter the normal running state and do the following:
-
Real time update when a user’s line state changes
-
Call control is available
Two different Tomcat modules handle the entire integration between Zylinc and Cisco. Each of them handles different functions, and you shouldn’t install only one of them without the other.
-
Cisco Directory Sync: User synchronization and mapping of users, phone numbers and phone devices. Re-mapping of user devices when users log in or out of Extension Mobility or changes their seat.
-
Cisco User Proxy: Call control, line state, set or remove forwards, send DTMF.
For devices that don’t support CTI, you can use a third module, SIP User Proxy, to show line state.
This SQL Script shows a list of all known Cisco users and their mapped Devices, imported from all known Cisco Provider Configurations in the Administration Portal. The script returns a row for each user. The number of returned rows should match the total number of users in Call Manager.
The first column will show an error if the user has mapping errors. This means that the user exists in Cisco, but not in the Zylinc user database. If the user exists in both places, the selected mapping doesn't work. This may be OK for test users and other special users. Line state and call control will not work for affected users.
The second column will show an error if the user has never logged in to the device, if the device was never online, or if the user has no device at all. Line state and call control will not work for affected users.
The second column will show a warning, if the user has more than one device. Call control will work only on the device that the user logged in to most recently. Line state will work and show the combined result of all the mapped devices.
Note the following requirements for this script:
-
Correct configuration of the Cisco integration
-
The Cisco Directory Sync and the Cisco User Proxy modules must be running
-
If Cisco PBX ID Mapping is changed, users must be formatted via the Format Users function in the Administration Portal
Do the following to use the script:
-
In the Administration Portal menu, select SYSTEM > User Directory
-
Click Format Users (unless you didn't change anything since last Format Users)
-
Open SQL Server Management Studio
-
Connect to the SQL server that hosts ZyDB
-
Click New Query
-
Copy/paste this SQL code into the query window, and replace the second word ZyDB with the name of your ZyDB database.
Use ZyDB select 'ERROR: no user mapping' as 'USER MAPPING STATUS' , 'ERROR: no device mapping' as 'DEVICE MAPPING STATUS', '' as 'MAPPED DEVICE ID', *,'' as 'device_id','' as 'user_id','0' as sort from vtm_user where (vtm_user.user_id not in (select pbx_id as user_id from usr_workset) ) union select 'User mapping ok' as 'USER MAPPING STATUS' , 'ERROR: no device mapping' as 'DEVICE MAPPING STATUS', device_id as 'MAPPED DEVICE ID', *, '1' as sort from vtm_user left join vtm_user_controlled_device on vtm_user_controlled_device.user_id=vtm_user.user_id where (vtm_user.user_id in (select pbx_id as user_id from usr_workset) ) and (device_id is null) union select 'User mapping ok' as 'USER MAPPING STATUS' , 'Device mapping ok' as 'DEVICE MAPPING STATUS', device_id as 'MAPPED DEVICE ID', * , '3' as sort from vtm_user inner join vtm_user_controlled_device on vtm_user_controlled_device.user_id=vtm_user.user_id where vtm_user.user_id in (select pbx_id as user_id from usr_workset) and (device_id is not null) and vtm_user.user_id not in (SELECT user_id FROM vtm_user_controlled_device GROUP BY user_id HAVING COUNT(*) > 1) union select 'User mapping ok' as 'USER MAPPING STATUS' , 'WARNING: more than one device' as 'DEVICE MAPPING STATUS', '<several devices>' as 'MAPPED DEVICE ID', *, '<several devices>' as 'device_id',user_id 'user_id' , '2' as sort from vtm_user where vtm_user.user_id in (SELECT user_id FROM vtm_user_controlled_device GROUP BY user_id HAVING COUNT(*) > 1) order by sort , vtm_user.user_id
- Click ! Execute (or F5) to execute the SQL query
For troubleshooting related to Cisco line state or Cisco Call Control, you can inspect the terminal status of all known Cisco devices (desktop phones or Jabber soft phones) via the Terminal Status link on the Cisco User Proxy Tomcat page.
- In the Administration Portal menu, select SYSTEM > Interface Configuration
- Cisco User Proxy contains an URL that you have previously entered
- Make a copy of the URL in Cisco User Proxy
- Paste the URL into the web browser
- Log in with the Tomcat user named admin
- Click Terminal Status
A window will show a list of all phone devices that are currently known to the Cisco integration.
Phone devices will be visible in the following cases:
- The Cisco application user must be associated with the device
- The phone device is owned by a Cisco end user, or the phone device registration status shows up as registered in Call Manager
The column with the name Restricted has a special meaning:
- Restricted = false: This device can be accessed via CTI.
- Restricted = true: This device can’t be accessed via CTI.
- Verify that the device is connected and registered in Call Manager
- The device will appear as restricted=true if it is not registered in Call Manager, or if the device is offline.
- For a Jabber softphone this usually means that the user is not logged in to his computer.
-
Verify that Allow Control of Device from CTI is selected for the phone device
If your Call Manager was upgraded from an old version, check that Allow Control of Device from CTI is selected for the affected phone:
-
Log in to the Cisco Unified CM Administration (CCMAdmin) web page. (Typical user name: ccmadmin)
-
Select Device > Phone
-
Select Allow Control of Device from CTI
-
-
Verify that Allow Control of Device from CTI is selected for the end user
If your Call Manager was upgraded from an old version, check that Allow Control of Device from CTI is enabled for the affected user:
- Log in to the Cisco Unified CM Administration (CCMAdmin) web page. (Typical username: ccmadmin)
- Select User Management > End User
- Click the User ID that belongs the user of the device that appears as restricted
- Select Allow Control of Device from CTI
Test that Cisco integration is "started and working"
The procedure for testing that the Cisco integration is started and working is previously described in the following tasks:
-
Search for the word Cisco in the list. The list should contain two log files CiscoDirSync.log and CiscoUserProxy.log.
- Open both log files in Notepad++ and search for the words error or exception. The lines in the log files that contain those words should provide detailed information about errors that prevent the system from running correctly.
This is help for Zylinc version 6.0. To view Zylinc unified help for other versions, go here.
© 2021 Zylinc A/S • Disclaimer
Help version: 22 January 2021 13:21:22
Share this topic: