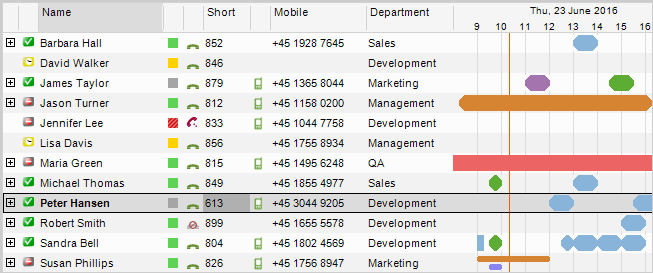
The Time overview in Zylinc Attendant Console, Contact Center, and Service Center displays people and other resources, for example meeting rooms or queues, as well as information about their status and availability.
The amount of people and other resources you'll see in the Time overview depends on whether you've searched for someone/something or whether you've selected a specific group.
Until you've searched or selected a group, the Time overview will either be empty or display every person and resource. Exactly what the Time overview displays, and how it displays it, depends on your setup. Ask your Zylinc administrator if you're in doubt.
The Time overview's calendar displays people' appointments, etc.
If you can't see the calendar, try to right-click the Time overview's header row and select Calendar. Some organizations don't use the Time overview's calendar.
The calendar overview by default covers one day, but you can select a different number of days in the Change calendar settings. If the calendar overview shows more than one day, you can click a date in the Time overview's header to focus on the selected day. To return to the standard view, click the date again.

The calendar overview displays appointments as colored bars. The length and position of a bar shows the start and end time of the appointment.
The color indicates the type of appointment. If only the outline is colored, the person or resource is available during the appointment.
If someone has appointments before or after the period of time you're able to view, an arrow appears in the right or left side of the calendar overview. The color of the arrow indicates what kind of appointment it is. If a user has appointments that overlap, they're displayed next to each other.
Examples of appointments in calendar overview:
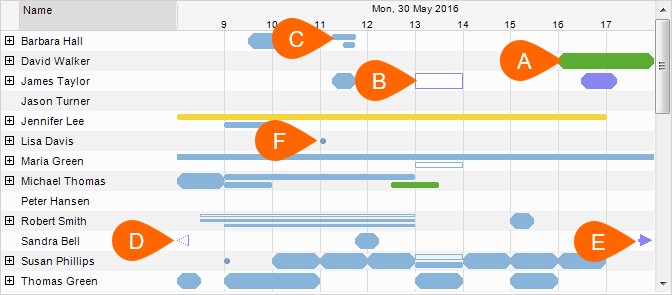
 Regular appointment
 Someone has an appointment but is still available
  Someone has two appointments that overlap
 Someone had an appointment earlier (and was available during the appointment)
 Someone has an appointment later in the day
 Someone has a reminder
If you want to view all of someone's appointments on separate rows, click ![]() next to their name.
next to their name.
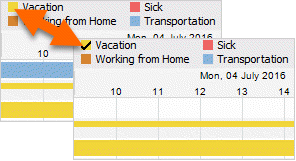
If you use color legends (see Customize content and appearance in the following), you can view the colors for the different types of appointments in the top part of the Time overview. If you only want to view a certain type of appointment, select that color legend.
Each column in the Time overview contains different information, such as phone number, status, or department. You can customize the Time overview so that it displays the columns that you find most important.
You can also customize the appearance of the Time overview, such as shadow effects and whether to show legends.
Right-click the Time overview's header bar and select the columns that you want to view.
You can select between these columns (in the following we assume that you want to view information about people, but remember that the Time overview can also list other resources, such as meeting rooms or queues):
-
Activity: Texts that describe current activity
-
Activity Status: Icons that represent current activity
-
Agent Status: Icons that represent agents' current activity
-
Alternative Contact: Who to contact if someone is busy. In Change settings, you can create a shortcut to show someone's alternative contact in the Time overview.
-
Available From: The time when people will become available. Empty if they're already available.
-
Camp: Calls that wait for someone.
-
Calendar: The portion of the Time overview that contains the calendar.
-
Company
-
Department
-
Email
-
Expand/Collapse: Automatically enabled if you use the calendar overview. If someone has multiple appointments during the day, you can click
 in this column to view each appointment on individual rows.
 -
Jabber: Icons that represent people's Jabber® status. Jabber is a messaging service. Double-click an icon to start a Jabber session with someone.
-
Jabber Status: Texts that describe people's Jabber status.
-
Keywords: You can find people if you search for these keywords instead of regular contact information. You can add or remove keywords, for example about special skills, when you edit people's user properties.
-
Line status: Status of people's phones. Double-click a status icon to call someone's phone. If someone's phone rings, you can double-click the icon to answer the call.
-
Managed by: Names of people's managers.
-
Mobile: People's mobile numbers. Double-click a number to call it.
-
Mobile Status: Status of people's mobile phones. Double-click a status icon to call someone's mobile.
-
Name: People's names. If you've selected a group, the name of the group will be displayed in brackets at the top of this column.
-
Note: Additional information. You can specify a note when you edit someone's user properties.
-
Office Name: Name of office location. This column is useful if you want to sort the Time overview by office.
-
Office phone: People's office phone numbers. Double-click a number to call it.
-
Organization: This column is useful if you want to sort the Time overview by organization.
-
Sametime: Icons that represent people's Sametime® status. Sametime is a messaging service.
-
SfB: Icons that represent people's Skype for Business status. Double-click an icon to start a Skype for Business session with someone.
-
SfB Activity: Texts that describe people's Skype for Business status.
-
SfB Location: People's locations as specified in Skype for Business.
-
SfB Number: People's Skype for Business numbers. Double-click a number to call it.
-
Short Number: Double-click a number to call it.
-
Subject: Subjects of people's current calendar appointments.
-
Title: Job titles.
-
Unified Presence: Summaries of people's status, for example based on their calendar, line status, mobile status, and Skype for Business status. In Settings, you can select exactly which sources should be used for unified presence.
You can customize and change the graphical appearance of the Time overview and its calendar overview.
Depending on which Zylinc desktop program you use, you either select your preferences in a toolbar at the top of the Time overview, or you select File > Time Preferences from the top menu.
-
Show Subject: Appointment subject written inside the colored bars in the calendar overview.
-
Show Hour Lines: Thin vertical line for every hour in the calendar overview.
-
Paint Grading: Shadow effect on colored bars in the calendar overview.
-
Show Busy Line: Line at the bottom of the Time overview that indicates how busy selected people are. If you select several people in the Time overview, the line summarizes their appointments: the more bright yellow the line becomes, the less available the selected people are.
-
Hide users without appointments: Only view users who have appointments within the displayed period of time. Useful when you want an overview of how many are busy in the displayed period.
If someone's hidden because he or she doesn't have any appointments, you can't search for them.
-
Show Legends: Overview of what each appointment color means. You can use this to only show certain types of appointments if you click those color legends.
-
Hide previous appointments: Automatically update the start time of the displayed period of time, so that only appointments from the current time of day are displayed.
-
Hide disconnected icon: People's phone status will be empty if their phones are disconnected.
-
Users shown: Only available if you use a Zylinc program where you select time preferences in a toolbar at the top of the Time overview. Lets you select whether you want to view people, resources, rooms, or all three.
-
Interval: Period of time displayed per day in the Time overview's calendar overview.
You can sort most of the Time overview's columns when you click the column header. The column used to sort the content is indicated by a dark gray color.
The following describes status icons specifically used in Zylinc desktop programs. For descriptions of icons that represent Skype for Business, Sametime and Jabber status, refer to the documentation for those products.
Line status shows the status of someone's phone. In the Time overview, you can place your mouse pointer over an icon to view more information, such as who the person talks to.
 The person is not on the phone and is ready to answer a new call
 The person's phone rings
 The person has enabled Do Not Disturb
 The person has an active call
 The person has a call on hold
 The person doesn't have a phone connected
 The person's calls are forwarded
 The person's calls are forwarded because of a calendar appointment
 The person's calls are permanently forwarded.
Mobile status shows the status of someone's mobile phone. In the Time overview, you can place your mouse pointer over an icon to view more information, such as who the person talks to.
 The person's mobile is idle and ready for a new call
 The person has an active call
 The person has enabled Do Not Disturb
 The person's mobile is offline
 The user is abroad (roaming)—this icon appears on top of the icons that represent the user's mobile status.
Unified presence is a summary of someone's combined status from several sources, for example calendar, line status, mobile status, and Skype for Business, so that you can quickly tell if they're available or not.
 The person is available
 The person is busy
 The person is away
In Change settings, you can select exactly which sources should be used for unified presence.
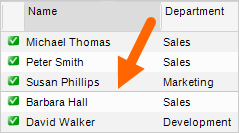
If you often work with certain people or other resources, you can set them as favorites, so that they're always displayed in the top part of the Time overview.
To add someone as a favorite, right-click their name in the Time overview, and select Add/remove from your favorite list.
When you have a favorites list, you can change the order of your favorites if you drag them into the required order.
Your favorites are separated from other users by a horizontal line in the Time overview.
In Settings, you can select to if your favorites should be hidden or always displayed when you search.
To send an e-mail or SMS text message to someone, right-click their name in the Time overview, and select Send Message. See more in Send a message to somebody.
To start a chat with someone, double-click the Skype status icon next to their name.
You can share someone's contact information with someone else by e-mail or SMS text message. This is useful, for example if you want to send information about a colleague to a customer or vice versa.
To share contact information from the Time overview, right-click the person whose information you want to share, and select Share Contact Info...
If you share a colleague's contact information by e-mail, the colleague's business card will, if available, automatically be attached.
To find out when people (and rooms, etc.) are available for meetings or other appointments:
-
Select the required people and resources in the Time overview.
Press CTRL on your keyboard to select multiple people, etc. Alternatively, select a group. If not all group members are relevant, you can clear them later.
-
Right-click your selection, and select Find Available Time.
-
Select duration of the appointment.
-
Specify the period of time that you want to search within.
-
Click Search to view times when everyone is available.
-
If there are suitable times, select one in the right part of the window.
-
If you want to copy the information for use in another program, click the Copy to Clipboard button.
-
To schedule a meeting, select the exact time for the meeting (there may be several options, especially if the meeting is short).
Example: If everyone's available between 10.00 and 11.00, and the meeting takes 30 minutes, you can select between 10.00-10.30, 10.15-10.45, and 10.30-11.00.
-
Click Create Meeting. Your e-mail client will now open with the participants and meeting time inserted, so that you can quickly book the meeting.
When you right-click the names of people or resources in the Time overview, you can quickly access more features—if your Zylinc administrator has enabled them:
- Edit the properties of people and resources
- View group memberships
- Forward calls to other phones
- Manage absence
- Schedule dialout
This is help for Zylinc version 6.0. To view Zylinc unified help for other versions, go here.
© 2021 Zylinc A/S • Disclaimer
Help version: 22 January 2021 13:21:22
Share this topic: