
You answer and handle calls in the small Contact Center window.
Contact Center can distribute three types of calls to you. The most common type is incoming calls, but you may also get callbacks and dialouts.
You can also make outgoing calls, if you need to transfer an incoming call to somebody else in your organization, or if you simply need to call someone.
Quick tour of an incoming call
When you receive a call, the Contact Center window's Channels tab expands.
A countdown shows how much time you have to answer the call. If you don't answer the call in time, your status will change to unreachable. If you're not ready to answer the call, click Ext. Offer to restart the countdown. You can only restart the countdown once.
To prepare for the call, you can view details about the caller and the queue on the Channels tab. You may also be able to look up more information about the caller in your organization's records.
 Look up details about the caller in a third-party system
If the call has been transferred to you, you may be able to view notes from other agents about the history of the call.
 View call's history
When you're ready, click Answer (unless the call that you've received is a callback or a dialout). If you've enabled a personal pickup announcement, it'll be played immediately after you answer the call, before your conversation starts.
How do I know if a call is a callback or a dialout?![]()
If you get a callback, you'll see Call and Play buttons instead of an answer button.
If the Play button is available, the caller has left a recorded voice message. Click to listen to the message. You can only listen to such messages before you make the callback.
What happens to the countdown while I listen to the message?![]()
When ready, click Call. You'll now call the number that the caller originally called from.
With the  button, you can enter and call another number than the caller's original number. This can be useful, for example if the caller has left a message that says that if you call them back between 10 and 11, you should call them at their sister's number.
If you get a dialout, you'll see a Call button instead of an answer button.
Make sure that you know the purpose of the call that you'll make. Dialouts are typically either coordinated in advance or have a note attached with the information you need to know before you call. If the history button has a notes icon, there's a note about the call.
When ready, click Call.
After you answer a call, everything you need to handle the call is available in the upper part of the Contact Center window.
|
|
To put a call on hold, click Hold. When you have a call on hold, the button changes to Resume. Click it to resume the call that you put on hold. If you have two calls, you can toggle between your two calls, so that you put the active call on hold and resume the other call. |


You can transfer a call in two ways: Unattended (that's when you specify somebody, and then transfer the call to them without talking with them first) or attended (that's when you specify somebody, call them, talk with them, and then transfer the call to them).
-
Specify where you want to transfer the call to. You can do that in several ways:
-
Enter a number in the field in the top part of the window
 . If you need to enter digits, click the
  icon.
icon. -
Select somebody in the Time window's Time overview. If the person has more than one phone number registered, for example an office phone number and a mobile number, click the number that you want to call.
-
If you want to transfer the call to another agent (who's online), select the agent on the Contact Center window's Agents tab.
When you transfer a call to an agent, you can add a note if required: Before you select the agent, click the History button on the Calls tab, and write your note. Only agents can view notes.
You may not be able to call all agents, because an agent's phone type determines if you can call that agent.
-
If you want to transfer the call to another queue (that's open), select the queue on the Contact Center window's Queues tab.
If you transfer a call to another queue, the caller will get their initial waiting time credited to the next queue. Example: A caller waits for five minutes in queue 1 before you answer their call. You find out that you're not the right agent for handling the caller's inquiry, so you transfer the inquiry to queue 2. Because the caller has already waited for five minutes on queue 1, they're automatically credited with five minutes on queue 2, so that they'll go in front of other callers who've waited less than five minutes in queue 2.
If you transfer a call to an agent or queue, you can also do it via the Time window's Time overview, but we don't recommend it, because the caller gets a better experience when you make the transfer via the Agents or Queues tabs. This is why:
When you transfer through the Agents or Queues tabs, the call will keep its history. For example, if the caller has entered an account number via an IVR menu while they waited in the queue, the call will keep that information when you transfer it.
If you transfer the call to another agent or queue through the Time overview, your transfer will technically count as a new call, so the original call's history—including the account number—won't be attached, and the caller might be asked to enter their account number again.
For transfers to queues, crediting of waiting time also depends on the call's history, so it'll only work if you transfer via the Queues tab. -
-
If you want to make an unattended transfer, click Transfer.
-
Attended transfers only: If you want to make an attended transfer, click Dial. When you've talked with the person you want to transfer the call to, click Transfer.
If the person you're going to transfer a call to uses voicemail, you can also transfer calls to their voicemail:
Prerequisite: Right-click anywhere in the Time window's header row, and make sure that Voicemail is selected. This ensures that you can view the voicemail column in the Time window. People who use voicemail will have a voicemail ![]() icon in that column.
icon in that column.
When you want to transfer a call to someone's voicemail, you have two options:
- Right-click the person's voicemail
 icon, and select to transfer the call to the person's voicemail.
 - Select the person's voicemail icon. When you click Transfer, the call will go to the person's voicemail.
You may not be able to record calls in your organization.
To record a call conversation, click the record button  .
.
Even if you begin to record in the middle of a conversation, the call will be recorded from the beginning.
While the call is recorded, the record button is animated.
If you make an outgoing call while you record an incoming call, the outgoing call will also be recorded.
When you end the last active call, the recording automatically stops.
After the recording ends, you may be asked to provide information about why you recorded the call.
To end a call, click Hang Up.
After you end a call, you may be asked to provide reason codes.
After that, you'll typically go into wrapup. That's a short amount of time when you'll not receive any new calls.
Your organization may use reason codes to track which types of calls you handle. This can be interesting for statistical purposes.
If your organization uses reason codes, you'll see them on the Channels tab after you end the call. Select the reason code that best describes the call, and then click Finish.
In some organizations, you can select multiple reason codes.
If your call was a callback or a dialout, there's a risk that you didn't get an answer from the person you called.
If so, you can postpone the call, so that you'll automatically get it again later.
Contact Center will try to make sure that you get the postponed call again later, but if you're not available, the call that you've postponed may go to another agent.
To postpone a callback or dialout:
-
Click Finish.
-
On the Channels tab, select Postpone - Busy or Postpone - No answer.
-
Select a postponement duration, for example 20 minutes or until a particular time that you specify yourself.
-
Click Finish.
Your Zylinc administrator may have set a limit for how many times it's possible to postpone a callback. Ask your Zylinc administrator if you're in doubt..
After you've ended a call, you'll typically go into wrapup. That's a short amount of time when you'll not receive any new calls. This gives you time to finish any call-related tasks before you get a new call.

A countdown shows how much time you have left to wrap up. When the countdown ends, you'll return to idle status. That means that you're ready to receive calls.
If you're ready to receive new calls before the countdown ends, click End.
If you need more wrapup time, click Extend to restart the countdown.
You can only make one outgoing call at a time. You can make outgoing calls while you handle an incoming call, but you can't receive incoming calls while you handle an outgoing call.
-
Specify the person or number that you want to call. You can do that in several ways:
-
Enter a number in the field in the top part of the window
. If you need to enter digits, click the icon. -
Select somebody in the Time window's Time overview. If the person has more than one phone number registered, for example an office phone number and a mobile number, click the number that you want to call.
-
If you want to call another agent (who's online), select the agent on the Contact Center window's Agents tab.
You may not be able to call all agents, because an agent's phone type determines if you can call that agent.
-
-
Click Dial.
Your organization may use keyboard shortcuts for some of the call-related buttons, such as Answer and Dial.
To view which keyboard shortcuts are available, select the Time window, and then select Help > Shortcuts.
While you work in the Contact Center window, you can also press and hold down your keyboard's right CTRL key to quickly view keyboard shortcuts, provided your organization uses such shortcuts. This way of viewing shortcuts isn't available in all organizations.
To view background information about an ongoing call, for example which agents have handled the caller previously, click the history button on the Contact Center window's Channels tab.
View call's history
You can view which agents have handled previous calls from the caller, and, if they transferred the calls, which numbers they transferred the calls to.
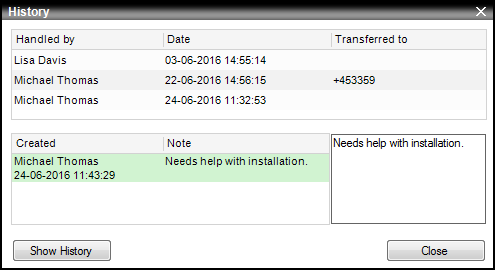
If another agent handled the ongoing call before you, he or she may have attached a note. If so, you can view the note, and add a new note yourself, if required.
Only agents can view and write notes about a call.
Notes only apply to the ongoing call; you can't view notes about previous calls.
If you want to view the full call history of the ongoing call, including when the call was queued or offered to an agent, click the Show History button to open a browser window with the available information.
To view the history of incoming and outgoing calls that you've handled, select the Time window, and then select File > Call History.
The Zylinc solution may ask your for your login credentials before you can view the call history.
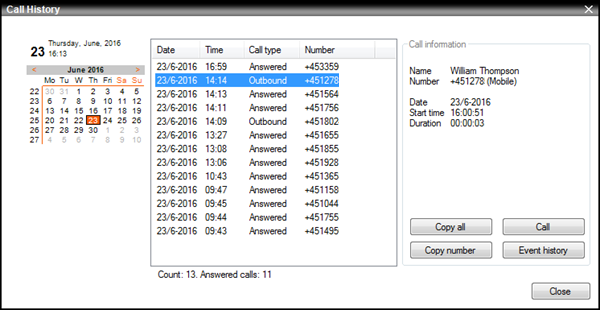
In the left side of the Call History window, select the day (or days) that you want to view. Use SHIFT+click to select a day range. Use CTRL+click to select multiple individual days.
In the center of the window, you can view calls that you've handled on the selected days. Select a call to view more information about it in the right part of the window. Click Event history to view more details about the selected call, such as when the call was queued.
You can also call the selected number, or you can copy it, for example if you need to send the number to a colleague.
This is help for Zylinc version 6.5. To view Zylinc unified help for other versions, go here.
© 2021 Zylinc A/S • Disclaimer
Zylinc unified help is a UK Technical Communication Awards winner 
Help version: 24 February 2021 14:16:14
Share this topic: